TVM 学习指南

0x0. 前言

最近粗略的看完了天奇大佬的MLC课程(顺便修了一些语法和拼写错误,也算是做了微弱的贡献hh),对TVM的近期发展有了一些新的认识。之前天奇大佬在《新一代深度学习编译技术变革和展望》一文中讲解了TVM Unify也即统一多层抽象的概念。这里的统一多层抽象具体包括AutoTensorization用来解决硬件指令声明和张量程序对接,TVM FFI(PackedFunc)机制使得我们可以灵活地引入任意的算子库和运行库函数并且在各个编译模块和自定义模块里面相互调用。TensorIR负责张量级别程序和硬件张量指令的整合。Relax (Relax Next) 引入relay的进一步迭代,直接引入first class symbolic shape的支持 (摘抄自《新一代深度学习编译技术变革和展望》一文)。然后这些抽象可以相互交互和联合优化来构造深度学习模型对应的最终部署形式。我个人感觉TVM Unify类似于MLIR的Dialect,但是这几个抽象的直接交互能力相比于MLIR的逐级lower我感觉是更直观方便的,毕竟是Python First(这个只是我最近看MLC课程的一个感觉)。对这部分内容感兴趣的读者请查看天奇大佬的TVM Unify介绍原文以及MLC课程。

这篇文章我将结合TVM Unify相关的抽象以及之前的一些积累重新梳理一下TVM的整体流程。我会从前端,中端(图优化Pass机制),代码生成(Schedule),Runtime,开发工具几个角度来介绍一遍。我对TVM的代码并没有做到精细的阅读,所以本文将尽量避免涉及到底层C++代码的细枝末节,而是从较为宏观的视角来讲清楚目前TVM的架构。本篇文章的所有参考资料以及idea主要来自我维护的这个仓库里面搜集的TVM的相关资料,TVM官方doc以及源码,MLC课程。上面这个仓库基本收集了TVM中文社区里面的大部分高质量博客或者专题,对TVM感兴趣的小伙伴可以自行下载或者收藏,更欢迎点个star。

写作不易,这篇文章对你有用的话也请点个赞👍。文章有错误也请指出,我动态修改。之后的计划应该会学习TVM如何和硬件的指令对接。

0x1. 前端

TVM为了向上兼容所有的机器学习框架如PyTorch,TensorFlow,ONNX等引入了Relay IR,机器学习模型在进入TVM之后首先会被转换为Relay IR。同时TVM为了向下兼容所有的硬件,引入了Tensor IR简称TIR,模型在被编译为指定硬件的源代码之前都会被Lower为TIR。另外,TVM社区正在开发新一代中间表示Relax(也被称为下一代Relay,目前还没有upstream主分支:https://github.com/tlc-pack/relax/tree/relax/python/tvm/relax),Relax是实现前言里面提到的TVM Unify关键的一环。TVM前端的架构可以粗略的表示为:

TVM前端架构图

接下来我们分别介绍一下 Relay,TIR,Relax这几种不同的前端表示。

0x1.1 Tensor IR(TIR)

由于无论是Relay还是新一代的Relax中间表示,它们最后都会被Lower到TIR(离硬件最近的IR),所以我们这里先介绍一下TIR。TIR的代码被封装在 tvm.tir中,一个TIR可以被编译成目标硬件的源代码或者中间表示例如C++源码,CUDA源码,LLVM IR等等。那么TIR是如何被编译为目标硬件的代码呢?这是因为TIR的数据结构其实是一个AST(抽象语法树),然后这个语法树可以表示变量的声明,初始化,变量的计算,函数调用以及控制流(如if-else条件判断,循环等等)等等。所以只要我们遍历一下TIR对应的AST就可以实现一对一的将其翻译到目标硬件了。可以借助这个图来理解:

在上图中有几个细节需要解释。首先是IRModule,IRModule 是在机器学习编译中保存元张量函数(也即PrimFunc)集合的容器对象,它是TVM进行编译的最小完整单元。TVM不同的前端表示最终都会被封装到IRModule中进行编译,在Linux下IRModule就是一个.so动态链接库。然后PrimFunc叫作元张量函数,它内部封装了一个完整的TIR AST。当IRModule被编译之后,每个PrimFunc都对应了这个动态库的一个函数入口,因此一个IRModule可以有很多个PrimFunc。然后上面的Codegen实际上就是对TIR AST进行中序遍历然后一对一的将AST Node翻译为相应的TIR Node对应的数据结构并发送给回调函数VisitExpr_ 和 VisitStmt。VisitExpr_ 用于处理 Expression Node,而 VisitStmt 用于处理 Statement Node。后续在介绍Codegen的时候我们再仔细探索一下这个转换流程。

这里还需要说明的一点是,在0.8之前的TVM要声明一个TIR AST依赖于对Tensor Expression的编译。现在TVM基于Python AST实现了一种新的特定领域的方言让我们可以直接使用Python来编写TIR AST。我们这里举一个例子:

1
2
3
4
5
6
7
8
9
10
11
12
13
14
15
16
17
18
19
20
21
@tvm.script.ir_module
class MyModule:
@T.prim_func
def mm_relu(A: T.Buffer[(128, 128), "float32"],
B: T.Buffer[(128, 128), "float32"],
C: T.Buffer[(128, 128), "float32"]):
T.func_attr({"global_symbol": "mm_relu", "tir.noalias": True})
Y = T.alloc_buffer((128, 128), dtype="float32")
for i, j, k in T.grid(128, 128, 128):
with T.block("Y"):
vi = T.axis.spatial(128, i)
vj = T.axis.spatial(128, j)
vk = T.axis.reduce(128, k)
with T.init():
Y[vi, vj] = T.float32(0)
Y[vi, vj] = Y[vi, vj] + A[vi, vk] * B[vk, vj]
for i, j in T.grid(128, 128):
with T.block("C"):
vi = T.axis.spatial(128, i)
vj = T.axis.spatial(128, j)
C[vi, vj] = T.max(Y[vi, vj], T.float32(0))

它实现的功能对应的numpy代码为:

1
2
3
4
5
6
7
8
9
10
11
def lnumpy_mm_relu(A: np.ndarray, B: np.ndarray, C: np.ndarray):
Y = np.empty((128, 128), dtype="float32")
for i in range(128):
for j in range(128):
for k in range(128):
if k == 0:
Y[i, j] = 0
Y[i, j] = Y[i, j] + A[i, k] * B[k, j]
for i in range(128):
for j in range(128):
C[i, j] = max(Y[i, j], 0)

其中,@tvm.script.ir_module表示被修饰的MyModule是一个待编译的IRModule,而 @T.prim_func表示被修饰的main函数是元张量函数(PrimFunc),这个函数内部定义的就是TIR AST。

0x1.2 了解tvm.ir基础设施

继续讲Relay IR以及Relax之前我们先了解一下 tvm.ir这个抽象,无论是TIR还是Relay/Relax IR它们都对应了IRModule这个统一的最小编译单元,同时它们也对应的有一套共用的IR基础设置,具体实现在 https://github.com/apache/tvm/tree/main/include/tvm/irhttps://github.com/apache/tvm/tree/main/src/ir目录下。

对于IR来说,Type和Expr是尤为关键的两个概念。Type包含基础的数据类型如Int,Float,Double等等,也包含一些自定义的复杂类型比如函数类型,Tensor类型等。而对于Expr来说,既包含可以直接映射到Low-level IR的PrimExpr,又包含RelayExpr。

我们可以在 https://github.com/apache/tvm/blob/main/include/tvm/ir/type.h中看到对PrimTypeNode的定义:

1
2
3
4
5
6
7
8
9
10
11
12
13
14
15
16
/*!
* \brief Primitive data types used in the low-level IR.
*
* PrimType represents POD-values and handles that are
* not automatically managed by the runtime.
*
* \sa PrimType
*/
class PrimTypeNode : public TypeNode {
public:
/*!
* \brief The corresponding dtype field.
*/
runtime::DataType dtype;
...
};

可以看到PrimType可以直接对应到Low-level IR的基础数据类型。我们还可以找到FuncTypeNode的定义:

1
2
3
4
5
6
7
8
9
10
11
12
13
14
15
16
17
18
19
20
21
22
23
24
25
/*!
* \brief Function type.
*
* We support polymorphic function type.
* This can be roughly viewed as template function in C++.
*
* \sa FuncType, TypeVar, TypeConstraint
*/
class FuncTypeNode : public TypeNode {
public:
/*! \brief type type of arguments */
Array<Type> arg_types;
/*! \brief The type of return value. */
Type ret_type;
// The following fields are used in polymorphic(template) functions
// For normal functions, the following two fields will be empty.
/*! \brief The type parameters of the function */
Array<TypeVar> type_params;
/*!
* \brief potential constraint the type need to obey
* \note this field is reserved for futher purposes.
*/
Array<TypeConstraint> type_constraints;
...
};

从注释可以看到FuncType类似C++的模板函数,记录了函数的参数类型和返回值类型以及模板参数,约束等信息。然后我们还可以关注一下和深度学习模型结合得很紧密的TensorTypeNode类型。

1
2
3
4
5
6
7
8
9
10
11
12
13
14
15
16
17
18
19
20
/*!
* \brief This is the most commonly used type in relay.
* TensorType have a fixed dimension, data type.
*
* The elements of shape can be either IntImm(constant integer),
* or any symbolic integer expression.
* The symbolic integer allows generic shape inference in certain cases.
* \sa TensorType
*/
class TensorTypeNode : public BaseTensorTypeNode {
public:
/*!
* \brief The shape of the tensor,
* represented by PrimExpr(tvm::Expr).
*/
Array<PrimExpr> shape;
/*! \brief The content data type */
DataType dtype;
...
}

我们从TensorTypeNode的定义可以看到shape也是TensorType的一部分,所以TVM在做类型推断的时候也包含了Shape的推断。也正是因为在IR中Shape是Type的一部分(比如 Tensor[(m, n)]Tensor[(m, 4)]是不同的Type)导致TVM对动态Shape的支持非常困难,因为Expr的类型推断是不支持动态Shape的。这里需要提一下,Relax通过引入一个新的Type叫作DynTensor较好的解决了动态Shape的表示问题,DynTensor包含的信息是Dtype和Shape的纬度,但Shape本身的表达式是独立存储的。也就是 Tensor[(m, n)]Tensor[(_, _)]都是同一个Type, 但是 Tensor[(_, _)]Tensor[(_, _, _)]是不同的Type,这样就从原生上支持了动态Shape。我们从 https://github.com/tlc-pack/relax/blob/95035621177fa0be4adfb55c766f030563e515a5/include/tvm/relax/type.h#L78这里可以看到DynTensor的定义:

1
2
3
4
5
6
7
8
9
10
11
class DynTensorTypeNode : public BaseTensorTypeNode {
public:
/*!
* \brief The number of dimensions of the tensor, use -1 to denote tensor with unknwon number of
* dimensions.
*/
int ndim; //现在直接定义ndim而不是shape
/*! \brief The content data type, use void to denote the dtype is unknown. */
DataType dtype;
...
};

我们紧接着看一下Expr的定义(https://github.com/apache/tvm/blob/main/include/tvm/ir/expr.h),Expr分成PrimExpr以及RelayExpr。其中PrimExpr保存了一个runtime时候的Dtype,然后

1
2
3
4
5
6
7
8
9
10
11
12
13
14
15
16
17
18
19
20
/*!
* \brief Base node of all primitive expressions.
*
* A primitive expression deals with low-level
* POD data types and handles without
* doing life-cycle management for objects.
*
* PrimExpr is used in the low-level code
* optimizations and integer analysis.
*
* \sa PrimExpr
*/
class PrimExprNode : public BaseExprNode {
public:
// runtime::DataType(dtype) 在编译时和运行时提供粗粒度类型信息。
// 它动态地内置在 PrimExpr 表达式构造中,可用于快速类型检查。
// 当 PrimExpr 对应于 i32 等 POD 值类型时,dtype 足以决定 PrimExpr 的 Type
// 当 dtype 为 DataType::Handle() 时,表达式可以对应更细粒度的 Type,我们可以通过lazy类型推断得到类型。
DataType dtype;
}

例如表示一个整数的Expr就可以通过继承PrimExprNode来实现,IntImm表示的是整数字面值表达式,所以它记录了一个int类型的value成员。

1
2
3
4
5
6
7
8
9
10
11
12
// PrimExprs that are useful as runtime containers.
//
/*!
* \brief Constant integer literals in the program.
* \sa IntImm
*/
class IntImmNode : public PrimExprNode {
public:
/*! \brief the Internal value. */
int64_t value;
...
};

RelayExpr的定义如下:

1
2
3
4
5
6
7
8
9
10
11
12
13
14
15
16
17
18
19
20
21
22
23
24
25
26
27
28
29
30
31
32
33
34
/*!
* \brief 所有非Prim Expr的基础节点
*
* RelayExpr 支持张量类型、函数和 ADT 作为
* 一等公民。 对象对应的生命周期
* 由语言隐式管理。
*
* \sa RelayExpr
*/
class RelayExprNode : public BaseExprNode {
public:
/*!
* \brief 存储类型推断(类型检查)的结果。
*
* \note 这可以在类型推断之前未定义。 该值在序列化期间被丢弃。
*/
mutable Type checked_type_ = Type(nullptr);
/*!
* \return The checked_type
*/
inline const Type& checked_type() const;
/*!
* \brief 检查 Expr 的推断(检查)类型是否由 TTypeNode 支持并返回。
*
* \note 如果这个 Expr 的节点类型不是 TTypeNode,这个函数会抛出一个错误。
*
* \return 对应的 TTypeNode 指针。
* \tparam 我们寻找的特定 TypeNode。
*/
template <typename TTypeNode>
inline const TTypeNode* type_as() const;

...
};

总的来说,无论是高级别的Relay,Relax还是低级别的TIR,它们最终都是由这里的Expr和Type为基础来表达的。因为对于Relay和TIR来讲,它们的op定义都是继承自RelayExprNode:https://github.com/apache/tvm/blob/main/include/tvm/ir/op.h#L58。除了对Op名字,类型以及参数,属性等定义外还有一个特殊的参数 support_level,从注释上看应该是用来解释当前Op的等级,值越小表示这种Op类型等级越高(暂不清楚具体的作用)。

1
2
3
4
5
6
7
8
9
10
11
12
13
14
15
16
17
18
19
20
21
22
23
24
25
26
27
28
29
30
31
32
33
34
35
36
37
38
39
40
41
42
43
44
45
46
47
48
// TODO(tvm-team): migrate low-level intrinsics to use Op
/*!
* \brief Primitive Op(builtin intrinsics)
*
* This data structure stores the meta-data
* about primitive operators that can be invoked via Call.
*
* Low-level IR intrinsics(such as libc.expf) are also
* implemented via Op.
*
* \sa Op
*/
class OpNode : public RelayExprNode {
public:
/*! \brief name of the operator */
String name;
/*! \brief the type of the operator */
mutable FuncType op_type;
/*!
* \brief detailed description of the operator
* This can be used to generate docstring automatically for the operator.
*/
String description;
/* \brief Information of input arguments to the operator */
Array<AttrFieldInfo> arguments;
/*!
* \brief The type key of the attribute field
* This can be empty, in which case it defaults to anything.
*/
String attrs_type_key;
/*!
* \brief attribute type index,
* this field varies in each run and is not exposed to frontend.
*/
uint32_t attrs_type_index{0};
/*!
* \brief number of input arguments to the operator,
* -1 means it is variable length
*/
int32_t num_inputs = -1;
/*!
* \brief support level of the operator,
* The lower the more priority it contains.
* This is in analogies to BLAS levels.
*/
int32_t support_level = 10;
...
};

最后我们看一下IRModule的定义,https://github.com/apache/tvm/blob/main/include/tvm/ir/module.h#L56。我们说过IRModule是TVM编译的最小单元,我们可以从它的定义中发现它就是一系列BaseFunc(在下一节Relay的介绍中我们会讲到它的实现)的映射。

1
2
3
4
5
6
7
8
9
10
11
12
13
14
15
16
17
18
19
20
21
22
/*!
* \brief IRModule that holds functions and type definitions.
*
* IRModule is the basic unit for all IR transformations across the stack.
*
* Many operations require access to the global IRModule.
* We pass the IRModule by value in a functional style as an explicit argument,
* but we mutate the Module while optimizing programs.
* \sa IRModule
*/
class IRModuleNode : public Object {
public:
/*! \brief A map from ids to all global functions. */
Map<GlobalVar, BaseFunc> functions;
/*! \brief A map from global type vars to ADT type data. */
Map<GlobalTypeVar, TypeData> type_definitions;
/*! \brief The source map for the module. */
parser::SourceMap source_map;
/* \brief Additional attributes storing meta-data about the module. */
DictAttrs attrs;
...
}

其中type_definitions是对ADT的定义,本文不关注Relay中函数式编程的概念,所以不展开ADT以及Let Binding部分的概念和源码,感兴趣的朋友可以参考张伟大佬的这篇文章或者官方文档对Relay的介绍学习一下:https://zhuanlan.zhihu.com/p/446976730 。后面在介绍Relax IR的时候我们会看到,实际上Relax相比于Relay就类似于TensorFlow的静态图到PyTorch动态图的过度,更加强调数据流图的概念而非函数式编程的概念,我个人感觉也是为了易用性考虑吧。

0x1.3 Relay IR

接下来我们简单介绍一下Relay IR。首先Relay IR目前仍然是TVM和其它深度学习框架对接的主要方式,我之前在《【从零开始学TVM】三,基于ONNX模型结构了解TVM的前端》文章中以ONNX为例介绍了模型是如何转换为Relay IR的,然后这个Relay IR会被进一步封装为IRModule给TVM编译。

从源码角度来看,Relay的基类Expr就是tvm.ir基础设施中定义的RelayIR(https://github.com/apache/tvm/blob/main/include/tvm/relay/expr.h#L54)。

1
2
3
4
5
6
7
8
9
namespace relay {

using Expr = tvm::RelayExpr;
using ExprNode = tvm::RelayExprNode;
using BaseFunc = tvm::BaseFunc;
using BaseFuncNode = tvm::BaseFuncNode;
using GlobalVar = tvm::GlobalVar;
using GlobalVarNode = tvm::GlobalVarNode;
using tvm::PrettyPrint;

然后Relay还定义了ConstantExpr,TupleExpr,VarExpr,CallNodeExpr,LetNodeExpr,IfNodeExpr等多种Expr。我们可以看一下ConstantExprNode的定义,类定义中声明了数据data并定义了tensor_type方法返回data的类型,然后is_scalar函数用来判断这个常量是否为标量。

1
2
3
4
5
6
7
8
9
10
11
12
13
14
15
16
*!
* \brief Constant tensor type.
*/
class ConstantNode : public ExprNode {
public:
/*! \brief The data of the tensor */
runtime::NDArray data;

/*! \return The corresponding tensor type of the data */
TensorType tensor_type() const;

/*! \return Whether it is scalar(rank-0 tensor) */
bool is_scalar() const { return data->ndim == 0; }

...
};

然后我们再看一下VarNode的定义,Var就是Relay里面的变量,它的定义如下:

1
2
3
4
5
6
7
8
9
10
11
12
13
14
15
16
17
18
19
20
21
22
23
/*! \brief Container for Var */
class VarNode : public ExprNode {
public:
/*!
* \brief The unique identifier of the Var.
*
* vid will be preserved for the same Var during type inference
* and other rewritings, while the VarNode might be recreated
* to attach additional information.
* This property can be used to keep track of parameter Var
* information across passes.
*/
Id vid;
/*!
* \brief type annotaion of the variable.
* This field records user provided type annotation of the Var.
* This field is optional and can be None.
*/
Type type_annotation;

/*! \return The name hint of the variable */
const String& name_hint() const { return vid->name_hint; }
};

首先Id vid表示的就是变量的名称,可以理解为一个字符串,比如我们在可视化Relay IR时看到的以@开头的全局变量以及%开头的局部变量。这里的type_annotation表示变量的类型注释,这个字段是可选的。接下来我们再看一个FunctionNode的定义,FunctionNode就是IRModule中的BaseFunc在Relay里面的具体实现了:

1
2
3
4
5
6
7
8
9
10
11
12
13
14
15
16
17
18
19
20
21
22
23
24
25
26
/*!
* \brief Relay Function container
* \sa Function
*/
class FunctionNode : public BaseFuncNode {
public:
/*! \brief Function parameters */
tvm::Array<Var> params;
/*!
* \brief
* The expression which represents the computation of the function,
* the expression may reference the parameters, and the type of it
* or sub-expressions may reference the type variables.
*/
Expr body;
/*! \brief User annotated return type of the function. */
Type ret_type;
/*!
* \brief Type parameters of the function.
* Enables the function to vary its type based on these.
* This corresponds to template paramaters in c++'s terminology.
*
* \note This can be usually empty for non-polymorphic functions.
*/
tvm::Array<TypeVar> type_params;
}

FunctionNode的定义中有函数参数,函数体以及返回值类型和参数类型。其它类型的Relay表达式定义我们就不看了,感兴趣的读者可以直接在 https://github.com/apache/tvm/tree/main/include/tvm/relay阅读。

接下来我们解析一下Relay中的Op定义,上一节tvm.ir基础设施中我们已经提到无论是Relay还是TIR的Op都定义为一种RelayExpr,也就是OpNode的定义。我们这里看一个Relay定义的bias_add Op的例子来加深理解。

首先,我们为BiasAdd Op定一个属性类型记录它所有的属性,https://github.com/apache/tvm/blob/main/include/tvm/relay/attrs/nn.h#L35-L48,属性定义时我们还可以给属性设置描述和默认值:

1
2
3
4
5
6
7
8
9
10
11
12
13
14
/*!
* \brief Add a 1D Tensor to an axis of a data.
*
* \note bias_add is a special add operator that is in nn
* and enables automatic derivation of bias's shape.
* You can directly use add for more generalized case.
*/
struct BiasAddAttrs : public tvm::AttrsNode<BiasAddAttrs> {
int axis;

TVM_DECLARE_ATTRS(BiasAddAttrs, "relay.attrs.BiasAddAttrs") {
TVM_ATTR_FIELD(axis).describe("The axis to add the bias").set_default(1);
}
};

第二步,我们给Biass Add Op定义类型推断函数(https://github.com/apache/tvm/blob/main/src/relay/op/nn/nn.cc#L52):

1
2
3
4
5
6
7
8
9
10
11
12
13
14
15
16
17
18
19
20
21
22
23
24
25
bool BiasAddRel(const Array<Type>& types, int num_inputs, const Attrs& attrs,
const TypeReporter& reporter) {
ICHECK_EQ(types.size(), 3);
const auto* data = types[0].as<TensorTypeNode>();
if (data == nullptr) return false;

const BiasAddAttrs* param = attrs.as<BiasAddAttrs>();
ICHECK(param != nullptr);
int axis = param->axis;
if (axis < 0) {
axis = data->shape.size() + axis;
}
if (axis >= static_cast<int>(data->shape.size()) || axis < 0) {
reporter->GetDiagCtx().EmitFatal(Diagnostic::Error(reporter->GetSpan())
<< "The axis in bias_add must be in range for the shape; "
<< "attempted to access index " << param->axis << " of "
<< PrettyPrint(data->shape));
return false;
}

// assign output type
reporter->Assign(types[1], TensorType({data->shape[axis]}, data->dtype));
reporter->Assign(types[2], types[0]);
return true;
}

假设这里指定的操作是 c = nn.bias_add(a , b),这里的逻辑就是根据输入a的类型推断b和c的类型并重写(Assign)。

第三步,我们把nn.BiasAdd Op注册到全局表中(https://github.com/apache/tvm/blob/main/src/relay/op/nn/nn.cc#L88-L103):

1
2
3
4
5
6
7
8
9
10
11
12
13
14
15
RELAY_REGISTER_OP("nn.bias_add")
.describe(R"code(Add bias to an axis of the input.
)code" TVM_ADD_FILELINE)
.set_attrs_type<BiasAddAttrs>()
.set_num_inputs(2)
.add_argument("data", "nD Tensor", "Input data.")
.add_argument("bias", "1D Tensor", "Bias.")
.set_support_level(1)
.add_type_rel("BiasAdd", BiasAddRel)
.set_attr<TOpPattern>("TOpPattern", kBroadcast)
.set_attr<FTVMCompute>("FTVMCompute", [](const Attrs& attrs, const Array<te::Tensor>& inputs,
const Type& out_type) {
const auto* param = attrs.as<BiasAddAttrs>();
return tvm::Array<tvm::te::Tensor>{topi::nn::bias_add(inputs[0], inputs[1], param->axis)};
});

注意到这里的op name/describe/num_inputs/arguments/support_level是对应了OpNode类的成员,然后OpNode还有一个attrs_type_key和attrs_type_index成员对应的就是BiasAddAttrs了。然后我们再看一下这个FTVMCompute这个用来描述Op计算逻辑的额外属性,它使用Op的输入,属性参数以及输出类型来确定这个Op的计算逻辑。

到这里可能你还有一个疑问,我们知道TVM的核心是计算和调度分离, Relay Op的调度逻辑是怎么注册的呢

TVM没有为每个Relay OP注册compute和schedule,而是为其注册fcompute和fschedule,然后根据输入和属性参数,输出类型等生成对应的compute和schedul,这种compute和schedule的组合对应了OpImplementation(https://github.com/apache/tvm/blob/main/include/tvm/relay/op_strategy.h#L39)。

1
2
3
4
5
6
7
8
9
10
11
12
13
14
15
16
17
18
19
20
21
22
23
24
25
26
27
28
29
30
31
32
33
34
35
36
37
38
39
40
41
42
43
44
45
46
47
48
49
/*!
* \brief Operator implementation that includes compute and schedule function.
*/
class OpImplementationNode : public Object {
public:
/*! \brief Compute function */
FTVMCompute fcompute;
/*! \brief Schedule function */
FTVMSchedule fschedule;
/*! \brief Name of the implementation */
String name;
/*! \brief Priority level */
int plevel;

void VisitAttrs(tvm::AttrVisitor* v) {
v->Visit("name", &name);
v->Visit("plevel", &plevel);
}

static constexpr const char* _type_key = "relay.OpImplementation";
TVM_DECLARE_FINAL_OBJECT_INFO(OpImplementationNode, Object);
};

/*!
* \brief Operator implementation class.
*/
class OpImplementation : public ObjectRef {
public:
/*!
* \brief Invoke the operator compute function.
* \param attrs The attribute of the primitive
* \param inputs The input tensors.
* \param out_type The output type information.
* \return The output compute description of the operator.
*/
TVM_DLL Array<te::Tensor> Compute(const Attrs& attrs, const Array<te::Tensor>& inputs,
const Type& out_type);
/*!
* \brief Build the computation schedule.
* \param attrs The attribute of the node.
* \param outs The output tensors.
* \param target The build target.
* \return The computation schedule.
*/
TVM_DLL te::Schedule Schedule(const Attrs& attrs, const Array<te::Tensor>& outs,
const Target& target);

TVM_DEFINE_OBJECT_REF_METHODS(OpImplementation, ObjectRef, OpImplementationNode);
};

从OpImplementation类的实现我们看出,它的Compute和Schedule就是根据fcompute和fschedule来生成的。

1
2
3
4
5
6
7
8
9
Array<te::Tensor> OpImplementation::Compute(const Attrs& attrs, const Array<te::Tensor>& inputs,
const Type& out_type) {
return (*this)->fcompute(attrs, inputs, out_type);
}

te::Schedule OpImplementation::Schedule(const Attrs& attrs, const Array<te::Tensor>& outs,
const Target& target) {
return (*this)->fschedule(attrs, outs, target);
}

然后由于特定的OpImplementation需要特定的条件,所以又按照这个条件(condition)进行分组,每一组被叫作OpSpecialization(https://github.com/apache/tvm/blob/main/include/tvm/relay/op_strategy.h#L92

1
2
3
4
5
6
7
8
9
10
11
12
13
14
15
16
17
18
19
/*!
* \brief Specialized implementations for operators under certain conditions.
*/
class OpSpecializationNode : public Object {
public:
/*! \brief List of implementations. */
Array<OpImplementation> implementations;
/*! \brief Condition to enable the specialization.
* Could be undefined to represent generic case. */
te::SpecializedCondition condition;

void VisitAttrs(tvm::AttrVisitor* v) {
v->Visit("condition", &condition);
v->Visit("implementations", &implementations);
}

static constexpr const char* _type_key = "relay.OpSpecialization";
TVM_DECLARE_FINAL_OBJECT_INFO(OpSpecializationNode, ExprNode);
};

最后使用一个OpStrategy类来记录这个Relay Op的所有OpImplementation。(https://github.com/apache/tvm/blob/main/include/tvm/relay/op_strategy.h#L130

1
2
3
4
5
6
7
8
9
10
11
12
13
14
15
16
17
18
19
20
21
22
23
24
25
26
27
28
29
30
31
/*!
* \brief Operator strategy to choose implementation.
*/
class OpStrategyNode : public Object {
public:
/*! \brief List of operator specializations. */
Array<OpSpecialization> specializations;

void VisitAttrs(tvm::AttrVisitor* v) { v->Visit("specializations", &specializations); }

static constexpr const char* _type_key = "relay.OpStrategy";
TVM_DECLARE_FINAL_OBJECT_INFO(OpStrategyNode, ExprNode);
};

/*!
* \brief Operator strategy class.
*/
class OpStrategy : public ObjectRef {
public:
/*!
* \brief Add an implementation.
* \param fcompute Compute function
* \param fschedule Schedule function
* \param name Name of the implementation
* \param plevel Priority level of the implementation
*/
TVM_DLL void AddImplementation(FTVMCompute fcompute, FTVMSchedule fschedule, String name,
int plevel);

TVM_DEFINE_MUTABLE_OBJECT_REF_METHODS(OpStrategy, ObjectRef, OpStrategyNode);
};

其中,AddImplementation函数通过FFI机制在Python层也可以调用,大多数的Relay Op都是在Python端注册它的Strategy。我们以Relay的nn.Softmax Op为例看一下,它的Strategy(包含fcompute+fschedule)注册在 https://github.com/apache/tvm/blob/main/python/tvm/relay/op/strategy/generic.py#L152 和 https://github.com/apache/tvm/blob/main/python/tvm/relay/op/strategy/cuda.py#L78-L94

1
2
3
4
5
6
7
8
9
10
11
12
13
14
15
16
17
18
19
20
21
22
23
24
25
26
27
28
29
@override_native_generic_func("softmax_strategy")
def softmax_strategy(attrs, inputs, out_type, target):
"""softmax generic strategy"""
strategy = _op.OpStrategy()
strategy.add_implementation(
wrap_compute_softmax(topi.nn.softmax),
wrap_topi_schedule(topi.generic.schedule_softmax),
name="softmax.generic",
)
return strategy

@softmax_strategy.register(["cuda", "gpu"])
def softmax_strategy_cuda(attrs, inputs, out_type, target):
"""softmax cuda strategy"""
strategy = _op.OpStrategy()
strategy.add_implementation(
wrap_compute_softmax(topi.nn.softmax),
wrap_topi_schedule(topi.cuda.schedule_softmax),
name="softmax.cuda",
)
if target.kind.name == "cuda" and "cudnn" in target.libs:
strategy.add_implementation(
wrap_compute_softmax(topi.cuda.softmax_cudnn),
wrap_topi_schedule(topi.cuda.schedule_softmax_cudnn),
name="softmax.cudnn",
plevel=15,
)
return strategy

然后在 https://github.com/apache/tvm/blob/main/python/tvm/relay/op/nn/_nn.py#L40将实现的Strategy注册到nn.softmax op。

1
2
# softmax
reg.register_strategy("nn.softmax", strategy.softmax_strategy)

其实Relay Op除了Strategy属性之外,还又一些其它的属性,比如我们在 https://github.com/apache/tvm/blob/main/src/relay/op/nn/convolution.cc#L176 这里可以看到Op还可以有FInferCorrectLayout和TOpPattern属性用于后续优化(比如算符融合Pass就依赖了TOpPattern属性,Ansor的data layerout transform依赖FInferCorrectLayout属性)。

1
2
3
4
5
6
7
8
9
10
11
12
13
14
15
16
17
18
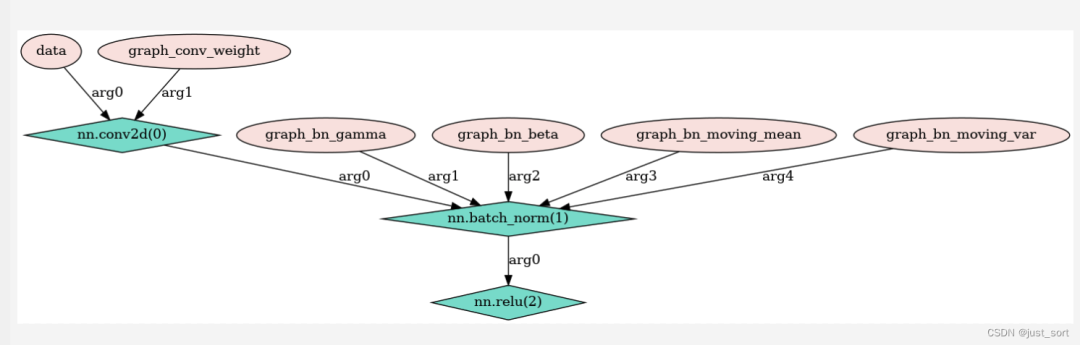
RELAY_REGISTER_OP("nn.conv1d")
.describe(R"code(1D convolution layer (e.g. spatial convolution over sequences).
This layer creates a convolution kernel that is convolved
with the layer input to produce a tensor of outputs.
- **data**: This depends on the `layout` parameter. Input is 3D array of shape
(batch_size, in_channels, width) if `layout` is `NCW`.
- **weight**: (channels, in_channels, kernel_size)
- **out**: This depends on the `layout` parameter. Output is 3D array of shape
(batch_size, channels, out_width) if `layout` is `NCW`.
)code" TVM_ADD_FILELINE)
.set_attrs_type<Conv1DAttrs>()
.set_num_inputs(2)
.add_argument("data", "Tensor", "The input tensor.")
.add_argument("weight", "Tensor", "The weight tensor.")
.set_support_level(2)
.add_type_rel("Conv1D", Conv1DRel)
.set_attr<FInferCorrectLayout>("FInferCorrectLayout", ConvInferCorrectLayout<Conv1DAttrs>)
.set_attr<TOpPattern>("TOpPattern", kOutEWiseFusable);

Relay就暂时讲到这里,Relay IR做为函数式风格的IR目前是TVM和其它深度学习框架交互的桥梁并且也经历了多年的维护完备性是比较好的(支持TensorFlow,PyTorch,Paddle,OneFlow各种主流深度学习框架)。但Relay的缺点在于由于共用了TVM的 tvm.ir 基础设施没办法支持Dynamic Shape导致Relay IR也无法支持Dynamic Shape,并且Relay IR这种函数式编程的风格相比于数据流图形式的计算图来说不是太直观。

0x1.4 Relax

由于Relax这个前端还没有正式upstream到apache tvm主分支,所以我这里就不从源码的角度来看。我们可以从Relax的wiki发现它不仅原生的支持动态Shape(通过提供DynTensor的抽象并将Shape从Tensor的type中分离出来实现的)还做了一个TVM Unify抽象,也就是天奇在《新一代深度学习编译技术变革和展望》一文中提到的,这个特点可以让不同的抽象之间相互交互和联合优化。这里提到的抽象包含AutoTensorization用来解决硬件指令声明和张量程序对接,TVM FFI(PackedFunc)机制使得我们可以灵活地引入任意的算子库和运行库函数并且在各个编译模块和自定义模块里面相互调用。TensorIR负责张量级别程序和硬件张量指令的整合。还有这里的Relax (Relax Next)。我们可以从下面的例子体会:

1
2
3
4
5
6
7
8
9
10
11
12
13
14
15
16
17
18
19
20
21
22
23
24
25
26
import tvm.script
from tvm.script import tir as T, relax as R

@tvm.script.ir_module
class MyIRModule:
@T.prim_func
def tir_exp_func(x: T.handle, y: T.handle): ## <= D2
X = T.match_buffer(x, (n,), "float32")
Y = T.match_buffer(y, (n,), "float32")
with T.grid(n) as i:
Y[i] = T.exp(X[i])

@R.function
def relax_func(x: R.Tensor[(n, k), "f32"], w: R.Tensor[_, "f32"]):
# n, k above are implicitly defined by the signature
# so we will be able to refer to n, k in the later part of the program
with R.dataflow(): ### <= D0
lv0 = R.match_shape(w, (k, m)) ## <= D1
lv1: R.Tensor[(n, m), "f32"] = R.dot(x, lv0)
lv2: R.Tensor[(n * m,), "f32"] = R.flatten(lv1) ## <= D1
lv3: R.Shape = (n * m,) ## <= D1
gv0: R.Tensor[lv2, "f32"] = R.call_tir(lv2, tir_exp_func, [lv3]) ## <= D2
R.outputs(gv0)

R.call_packed("custom_inplace_update", gv0) ## <= D0, D2
return gv0

注意这里展示的代码片段是Relax wiki提供的,由于没有upstream主分支,它的用法也许会有微小变化。我们从这个代码中可以看到,Relax把Relax Function和TIR Function放到了同一个IRModule(最小的编译单元)也就是说在任意时刻我们都可以同时拿到这两个不同层次的IR进行修改(或者说联合优化)这就摆脱了编译器范式里因为Lower导致丢失高层语义信息无法联合优化的问题。知乎上思远指出了一个很经典的例子,我这里附上他回答链接(https://www.zhihu.com/question/522101384/answer/2391922144)并截图来说明一下:

接下来我们翻译一下Relax的设计关键点来进一步体会Relax相比于Relay的变化(中间插了一些个人理解)。

D0:数据流块作为第一优先级的构造

大部分的relax_func都封装在with R.dataflow()构造里面。数据流块下的所有操作都是没有副作用的,并且不包含高级的控制流(比如if-then-else)或者嵌套区域。

一个数据流块可以有效地视为嵌入在程序里面的计算图。请注意,数据流块里面的大多数绑定变量(上面Relax脚本中的lv0, lv1, lv2, lv3)是local的,这意味着它们仅是块内可见的。这些变量可以被视为计算图的“内部节点”。我们可以将变量标记为输出(gv0),在这种情况下,该变量将在程序的后面部分可见。这些输出变量可以被视为计算图中的输出节点。

请注意,<span> </span>R.call_packed("custom_inplace_update", gv0) 在数据流块之外。数据流块之外的所有内容都可能产生副作用。因此,除非我们进行更仔细的分析,否则我们无法执行优化,例如根据拓扑顺序重新排序这些绑定。我们预计大多数优化将发生在数据流块级别。这些优化可以由熟悉计算图概念的 ML 工程师完成。隔离和表示有效组件的能力还为需要它们的地方提供了更高级别的优化机会。

D1:形状推导作为第一优先级的计算

形状推导对于动态模型工作负载至关重要。在动态形状设置下,我们通常需要在运行计算之前计算中间张量的形状。此外,我们还需要处理形状本身依赖于数据(例如unique op)的情况。最后,大多数动态形状工作负载仍然包含大量(部分)静态形状,理想情况下,我们希望利用这些静态形状信息进行优化。

1
2
3
4
5
6
7
8
9
10
11
12
13
14
15
16
17
18
19
from tvm.script import relax as R

@R.function
def shape_example(x: R.Tensor[(n, 2, 2), "f32"]):
with R.dataflow():
# symbolic and static shape deduction
lv0: R.Tensor[(n, 4), "f32"] = R.reshape(x, (n, 4))
lv1: R.Tensor[(n * 4,), "f32"] = R.flatten(lv0)
lv2: R.Shape = (n * 4,)
# external opaque shape function
lv3: R.Shape = R.call_packed("myshape_func", lv2)
lv4: R.Tensor[lv3, "f32"] = R.call_tir(lv3, "custom_func", [lv1])
# data dependent case
lv5: R.Tensor[_, "f32"] = R.unique(lv4)
# re-match shape
lv6: R.Tensor[(m,), "f32"] = R.match_shape(lv5, (m,))
gv0: R.Tensor[(m,), "f32"] = R.exp(lv6)
R.outputs(gv0)
return gv0

上述程序涵盖了形状推断的典型场景(在注释中标记)。重要的是,形状现在与张量值一起成为计算的一部分。这反映了形状的计算可以在运行时发生的事实。

而文本格式类型注释 lv0: R.Tensor[(n, 4), "f32"] 显示了每个Shape的值。这只是一个语法糖,从 IR 的角度来看,Shape字段 (n, 4) 不是 lv0.checked_type 的一部分。lv0 的类型是 DynTensor(rank=2, dtype="f32"),Shape是附加到每个 Expr 的特殊值字段。我们做出这个显式的选择是为了简化类型推断,这样我们就不需要进入完全依赖类型的领域。

有两个与符号Shape计算相关的关键结构:

D1a: match_shape

value = match_shape(lhs, pattern)

形状匹配构造接受一个 lhs 值和pattern(整型符号表达式)。它有两个重载语义:

  • 当 lhs 为 Tensor 时,将 lhs.shape 匹配到 pattern 中,如果第一次出现在 pattern 中,则填充对应的整型符号变量,然后返回一个与 lhs 相同但 shape 字段更新为 pattern 的 Tensor。
  • lhs 也可以是直接匹配 pattern 的 Shape。当我们想要分离出不对应于任何张量值的 Shape 函数时,这很有用。

比如:

1
2
3
4
5
6
7
8
9
10
11
12
from tvm.script import relax as R

@R.function
def shape_example(x: R.Tensor[_, "f32"], y: R.Tensor[_, "f32"]):
with R.dataflow():
# the match shape defines n, m because it appears for the first time
lv0: R.Tensor[(n, m)] = R.match_shape(x, (n, m))
# the second occurance of n, m will translate into an assertion
# that y's shape equals (n, m)
lv1: R.Tensor[(n, m)] = R.match_shape(y, (n, m))
# we can also call match_shape on shape expressions
lv2: Shape = R.match_shape(R.shape_of(y), (n, m))

特别注意这里lv2的Shape就被设置为(n, m),并且match_shape的lhs是一个Shape表达式,而不是Tensor。

D1b. 从符号整数元组构造Shape

在我们得到 n 和 m 等符号化整数之后。我们可以将它们重新组合在一起以形成一个 Expr。任何符号整数表达式的元组都可以在 Relax 中被识别为Shape 值。 比如 (n, m) 就是一个表示 Shape 的值。

Shape传播的方法

重要的是,现在Shape是计算过程中值的一部分。编译时Shape推断可以被看作是对发生在Shape上的操作的常量折叠,程序有几种Shape计算的方法:

  • 方法1: 符号化的形状传播。可以将Shape分解为符号整数比如上个脚本中的n和m,然后我们可以使用符号整数的表达式来代表Shape的计算比如 (n*4)。值得注意的是,静态形状是符号整数的一种特殊情况,然后我们可以重新组合符号整数来构造一个新的Shape如 (n*4)
  • 方法2: 不透明的Shape函数调用。我们还可以实现不透明的Shape函数比如 myshape_func(看上上个Relax脚本),这些不透明的Shape函数是快速破解运行时Shape函数的有用fallback(这里应该是说加上手工干预的形状推导?)。
  • 方法3:对于数据相关的Shape(如Unique),我们将简单地推迟到一个运行时的调用 f(inputs)->outpus 它接收一个输入张量,分配并返回输出张量。然后我们可以通过match_shape构造从Tensor值中获得lv5的形状。(看上上个Relax脚本)
Implications for pass writing

很多优化Pass都需要知道Shape信息。既然很多Shape可以是符号化的比如 (n, 4),那么理想的优化Pass将需要更泛化一点以利用符号信息。比如在上述脚本中,我们知道所有的 n都对应同一个值。这种约束很有用。因为符号化的整数(我们之前讲过对应 tir.PrimExpr )动态的执行常量折叠,当输入是静态Shape时计算的结果也应该动态的折叠为整形常数,保留我们执行静态Shape优化依赖的属性。因为我们现在可以在元组(n, 4)表示混合的静态符号Shape,所以我们可以尝试利用静态信息进行额外的优化。

D2:与 TensorIR 和 PackedFunc 直接交互

我们做出的最后一个关键设计决策是允许高层 IR 能够直接交互并调用低层 TensorIR 和 PackedFunc。TensorIR 函数和许多外部库采用目标传递约定(我们需要显式分配输出并作为参数传入函数)。我们使用 dps(destination passing) 来表示这个约定。dps 在低级 ML 优化中非常重要,因为它允许我们在可能的情况下一次性全局分配中间存储,并在没有主动内存分配的情况下执行计算。

调用 dps 函数意味着在调用之后,结果通过函数参数(例如,下面示例中的结果)而不是函数的返回值传回。

1
2
3
4
5
6
7
8
// not destination passing
int func(int x) {
return 1;
}
// destination passing
void func(int x, int *result) {
*result = 1;
}

dps 风格在本质上意味着突变(输出)。我们需要一种将调用桥接到Relax Dataflow的方法(可以观察一下Relax这一节开头那部分的脚本),以便我们可以对一系列 tir 调用执行计算图样式的重写。

D2a. call_tir

call_tir 是将调用桥接到Relax Dataflow的内嵌函数。它的命名含义是:“调用一个tir转换”

1
2
3
4
5
def call_tir(output_shape: Shape, lowlevel_func: Expr, inputs: Tuple[Expr]) -> Expr:
"""Example code to demonstrate the semantics of call tir"""
out_tensor = alloc_tensor(output_shape, current_expr.dtype)
lowlevel_func(*inputs, out_tensor)
return out_tensor

call_tir 接受输出形状,lowlevel_func(can be packed func, tir PrimFunc) 和一个输入元组。call_tir 的语义可以通过上面的代码来演示。值得注意的是,当我们lower call_tir 时,我们不需要选择单独的分配输出张量。编译器可以选择创建中间张量的内存计划,并将它们联系在一起以实现有效重用。

值得注意的是,call_tir 内嵌函数的 output_shape 参数可以是不透明的形状值、符号整数元组或常量形状(支持动态Shape)。

lowlevel_func 可以是任何带有签名的函数:fn(input0, input1,... out0, out1...)

最常见的两种情况包括:(1) TIR 函数 (2) 不透明的packed func

实现笔记

call_tir 可以实现为特殊的内嵌函数 (Op),以最大限度地减少对 IR 更改的影响(而不是独立的 IR 节点)。从 AST 的角度来看,这变为:

1
Call(op=Op::Get("relax.call_tir"), shape, lowlevel_func, inputs)

这也将允许 call_tir 的未来迭代而不改变 IR 本身,这可能在特定时间点需要:

  • 在同一个数组上启用多个突变序列(在 concat 相关操作的情况下)
  • 启用将符号化的Shape提示传递给融合操作。
对整合的影响

D2 使我们能够将较低级别的抽象直接嵌入到高级抽象(R.function)中。这释放了很多机会,包括但不限于:

  • 使用不同的策略逐步lower程序的不同部分。
  • 我们可以将call_tir节点作为AST的一部分进行优化,然后将一些关键信息比如data layerout信息带回到high level的IR获得更好的优化结果。
  • 将 BYOC 流作为转换的自然部分(通过将图的一部分转换为不透明打包函数的调用)。

这里的第二点实际上对应了Ansor引入的weight layout rewrite,即在算子auto-tuning之后,我们去分析最高效的weight layout,并且在编译时改写,来提高运行时的效率。那么没有Relax之前是怎么完成这个工作的呢?一个op 更适合的weight layout是要在tuning之后才能够知道的,而这个时候图IR已经被lower,不能修改了。所以Ansor用了一个非常tricky的方法,先lower一遍把tuning做好,再带着这些信息重新lower一遍。所以Relax通过消除lower的边界隔阂可以较好的解决这一问题。

D2b. Packed function calls

我们使用 R.call_packed 来指示对Packed Func的调用。从 AST 的角度来看,我们不需要引入额外的调用节点,而是可以引入一个 ExternFunc 构造,它表示我们可以调用的打包函数。

1
Call(op=ExternFunc("my_packed_func"), *args)

R.call_packed 仅用作表示上述 AST 节点的语法糖。这使我们能够统一所有调用。值得注意的是,它还允许我们在必要时混合打包函数和 call_tir。

1
lv4: R.Tensor[lv3, "f32"] = R.call_tir(lv3, "custom_func", [lv1]) 

对应于下面的 AST。

1
Call(op=Op::Get("relax.call_tir"), shape, ExternFunc("my_packed_func"), [lv1])

当我们想要将低级库(例如 cudnn)直接集成到高级而不调用内存分配时,外部打包函数上的 CallTIR 会很有用。

关于这一点在MLC课程中也有演示,通过dlpack调用PyTorch的Op来做优化,感兴趣的读者可以看一下,链接:https://mlc.ai/zh/chapter_end_to_end/index.html。

这里简单做一个总结,Relax作为下一代Relay不仅原生支持动态Shape且使用体验更加靠近PyTorch这种数据流图的编程方式。尤其重要的是Relax在为TVM Unify而服务,通过和TensorIR抽象,TVMFFI(Packed Func)的交互(通过MLC教程可以知道,也可以和Auto Schedule交互)使得TVM Unify的目标得到实现。

当然我也要说一下我目前看到的Relax的不完善的地方,那就是Relax目前和其它深度学习框架对接还不够完善,如果能实现Relay到Relax的自动转换那将是一个振奋人心的消息,可以最小化我们的迁移成本。

0x3. Tensor Expression(TE)

让我们回到开头的这个图:

TVM前端架构图

我们可以发现Relay要到TIR有2条路径,第一条就是直接到TIR比如PrimExpr派生的节点比如一个IntImmNode可以直接映射到TIR,另外一条就是Relay里面类似Conv的Op的计算逻辑是用TOPI来表达的,TOPI是TVM自己的一个算子库,这些算子可以通过TE来进行表达。

除此之外,我们在前端介绍Relax的时候已经可以看到要直接编写TIR AST,一种方法是使用TVMScript来表示抽象的计算逻辑,另外一种方法就是要通过TE,TE的代码无法被直接编译成目标硬件的代码,而是需要先Lower为TIR的元张量函数才可以进行编译。其实我之前写过一些Schedule相关的文章比如《【TVM 三代优化巡礼】在X86上将普通的矩阵乘法算子提速90倍》,也都是基于TE的。由此可见,TE不仅提供了另外一种编写TIR AST的方法,还提供了一系列变换TIR AST的Schedule。在0x5节我们会提一下Schedule。

我们先看一下给予TVM Script写的这个向量加法的例子:

1
2
3
4
5
6
7
8
9
10
11
12
13
14
15
16
17
18
19
20
@tvm.script.ir_module
class MyModule:
@T.prim_func
def main(a: T.handle, b: T.handle):
# We exchange data between function by handles, which are similar to pointer.
T.func_attr({"global_symbol": "main", "tir.noalias": True})
# Create buffer from handles.
A = T.match_buffer(a, (8,), dtype="float32")
B = T.match_buffer(b, (8,), dtype="float32")
for i in range(8):
# A block is an abstraction for computation.
with T.block("B"):
# Define a spatial block iterator and bind it to value i.
vi = T.axis.spatial(8, i)
B[vi] = A[vi] + 1.0


ir_module = MyModule
print(type(ir_module))
print(ir_module.script())

输出:

1
2
3
4
5
6
7
8
9
10
11
12
13
14
15
16
<class 'tvm.ir.module.IRModule'>
# from tvm.script import tir as T
@tvm.script.ir_module
class Module:
@T.prim_func
def main(A: T.Buffer[8, "float32"], B: T.Buffer[8, "float32"]) -> None:
# function attr dict
T.func_attr({"global_symbol": "main", "tir.noalias": True})
# body
# with T.block("root")
for i in T.serial(8):
with T.block("B"):
vi = T.axis.spatial(8, i)
T.reads(A[vi])
T.writes(B[vi])
B[vi] = A[vi] + T.float32(1)

然后我们使用TE DSL来表达这个向量加法:

1
2
3
4
5
6
7
from tvm import te

A = te.placeholder((8,), dtype="float32", name="A")
B = te.compute((8,), lambda *i: A(*i) + 1.0, name="B")
func = te.create_prim_func([A, B])
ir_module_from_te = IRModule({"main": func})
print(ir_module_from_te.script())

输出:

1
2
3
4
5
6
7
8
9
10
11
12
13
14
15
# from tvm.script import tir as T
@tvm.script.ir_module
class Module:
@T.prim_func
def main(A: T.Buffer[8, "float32"], B: T.Buffer[8, "float32"]) -> None:
# function attr dict
T.func_attr({"global_symbol": "main", "tir.noalias": True})
# body
# with T.block("root")
for i0 in T.serial(8):
with T.block("B"):
i0_1 = T.axis.spatial(8, i0)
T.reads(A[i0_1])
T.writes(B[i0_1])
B[i0_1] = A[i0_1] + T.float32(1)

从两个输出中我们可以看到,最后创建的IRModule其实是完全一样的。然后这个IRModule可以被编译为目标硬件上可以执行的代码。如果你想更加深入的了解TE是如何被编译成TIR的,可以看一下 《TVM 自底向上(三):TE 的概念和编译原理》 这篇文章,我这里借一下作者文章中的核心图简要说明一下:

img
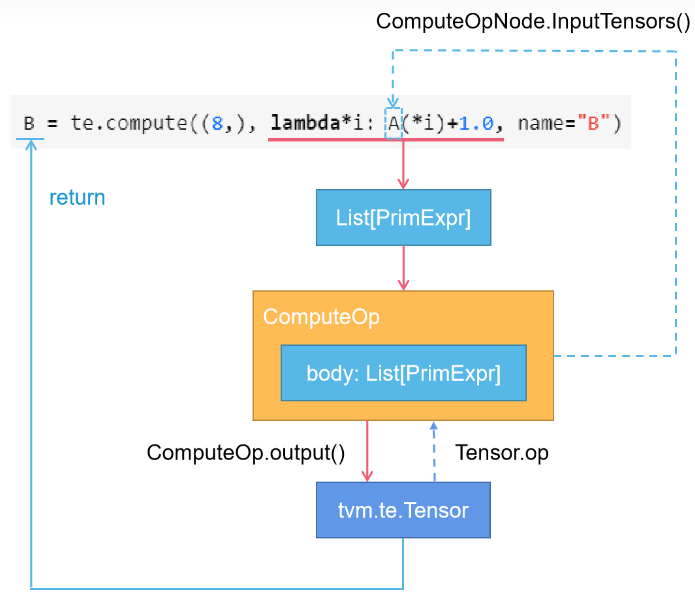
我们从上往下看,这里的List[PrimExpr]就是这个lambda表达式中的PrimExpr集合,第一个PrimExpr是A(*i),第二个PrimExpr是1.0,然后+对应了TIR中的ExprOp(https://github.com/apache/tvm/blob/main/python/tvm/tir/expr.py#L66),Expr作用在1个或者多个PrimExpr上得到的结果仍然是PrimExpr。实际上,这里的List[PrimExpr]就对应了这个lambda表达式的AST表示。接下来我们看一下te.compute的代码(https://github.com/apache/tvm/blob/main/python/tvm/tir/expr.py#L66):

1
2
3
4
5
6
7
8
9
10
11
12
13
14
15
16
17
18
19
20
21
22
23
24
25
26
27
28
29
30
31
32
33
34
35
36
37
38
39
40
41
42
43
44
45
46
47
48
49
50
51
52
53
54
55
56
57
58
59
60
61
62
63
64
65
66
67
68
69
70
71
72
73
74
75
76
77
78
79
80
81
82
83
84
85
86
87
88
89
90
91
def compute(shape, fcompute, name="compute", tag="", attrs=None, varargs_names=None):
"""Construct a new tensor by computing over the shape domain.
The compute rule is result[axis] = fcompute(axis)
Parameters
----------
shape: Tuple of Expr
The shape of the tensor
fcompute: lambda function of indices-> value
Specifies the input source expression
name: str, optional
The name hint of the tensor
tag: str, optional
Additional tag information about the compute.
attrs: dict, optional
The additional auxiliary attributes about the compute.
varargs_names: list, optional
The names to use for each of the varargs. If not supplied, the varargs
will be called i1, i2, ...
Returns
-------
tensor: Tensor
The created tensor
"""
if _tag.TagScope.get_current() is not None:
if tag != "":
raise ValueError("nested tag is not allowed for now")
tag = _tag.TagScope.get_current().tag
shape = (shape,) if isinstance(shape, tvm.tir.PrimExpr) else shape
# for python3
shape = tuple([int(s) if isinstance(s, float) else s for s in shape])
out_ndim = len(shape)
# 获取输入给lambda表达式的参数列表
argspec = inspect.getfullargspec(fcompute)
if len(argspec.args) == 0 and argspec.varargs is None:
arg_names = ["i%d" % i for i in range(out_ndim)]
elif argspec.varargs is not None:
# if there is a varargs, it takes the remaining dimensions of out_ndim
num_remaining_args = out_ndim - len(argspec.args)
if varargs_names is not None:
if len(varargs_names) != num_remaining_args:
raise RuntimeError(
f"Number of varargs ({num_remaining_args}) does not match number"
f"of varargs_names ({len(varargs_names)})"
)
arg_names = argspec.args + varargs_names
else:
arg_names = argspec.args + [f"i{i}" for i in range(out_ndim - len(argspec.args))]
else:
arg_names = argspec.args
# if there are fewer args than out dimensions, the remaining dimensions
# are implicitly broadcast
out_ndim = len(arg_names)
assert argspec.varkw is None, "Variable keyword arguments not supported in fcompute"
assert argspec.defaults is None, "Default arguments not supported in fcompute"
assert len(argspec.kwonlyargs) == 0, "Keyword arguments are not supported in fcompute"

if out_ndim != len(arg_names):
raise ValueError(
"Number of args to fcompute does not match dimension, "
"args=%d, dimension=%d" % (len(arg_names), out_ndim)
)

dim_var = [tvm.tir.IterVar((0, s), x, 0) for x, s in zip(arg_names, shape[:out_ndim])]
# 基于lambda表达式创建List[PrimExpr]
body = fcompute(*[v.var for v in dim_var])

# 将List[PrimExpr]传给TensorComputeOp进行计算并返回一个tvm.te.Tensor
if isinstance(body, _tensor.TensorIntrinCall):
for i, s in enumerate(shape[out_ndim:]):
var_name = "ax" + str(i)
dim_var.append(tvm.tir.IterVar((0, s), var_name, 4))
op_node = _ffi_api.TensorComputeOp(
name,
tag,
dim_var,
body.reduce_axis,
out_ndim,
body.intrin,
body.tensors,
body.regions,
body.scalar_inputs,
)
else:
if not isinstance(body, (list, tuple)):
body = [body]
body = convert(body)
op_node = _ffi_api.ComputeOp(name, tag, attrs, dim_var, body)

num = op_node.num_outputs
outputs = tuple(op_node.output(i) for i in range(num))
return outputs[0] if num == 1 else outputs

在compute的实现中最后返回的是TensorComputeOp对象的output()成员(也是一个tvm.te.Tensor), 同时这个tvm.te.Tensor包含这个TensorComputeOp对象(通过 .op来访问,在 https://github.com/apache/tvm/blob/main/python/tvm/te/tensor.py#L108可以看到)。

最后 func = te.create_prim_func([A, B])这行代码完成了TE到TIR的转换。这个api对应的c++实现在 https://github.com/apache/tvm/blob/v0.8.0/src/te/operation/create_primfunc.cc#L238这个文件,感兴趣的读者可以自行查看。基本流程就是将所有Operation对应的PrimExpr AST连在一起构成一个AST Graph,然后使用Post-DFS算法遍历这个AST Graph分别处理每一个Operation创建对应的TIR节点,最后构造一个完整的TIR PrimFunc。

TE除了可以构造TIR之外,另外一个重要的点就是它支持Schedule(tvm.te.Schedule),我在【TVM 三代优化巡礼】在X86上将普通的矩阵乘法算子提速90倍 文章中对GEMM优化的介绍就是基于TE Schedule来做变换进行优化计算的。

0x4. 图优化(Pass机制)

现在我们把目光转向图优化的Pass。之前我在【从零开始学深度学习编译器】七,万字长文入门TVM Pass 这篇文章中结合TVM的设计文档介绍了TVM Pass机制以及TVM编写Pass时是如何遍历节点和改写节点的,这里我们再整合一下。

首先,我们看一下TVM Pass的基类定义(https://github.com/apache/tvm/blob/main/include/tvm/ir/transform.h#L329):

1
2
3
4
5
6
7
8
9
10
11
12
13
14
15
16
17
18
19
20
21
22
23
24
/*!
* \brief PassNode is the base type of differnt types of optimization passes.
* It is designed as a pure class and implemented by different pass subclasses
* at different granularity of Relay nodes.
*/
class PassNode : public Object {
public:
virtual ~PassNode() {}
/*!
* \brief Get the pass information/meta data. */
virtual PassInfo Info() const = 0;

/*!
* \brief Transform mod using the default PassContext in the current scope.
*
* \param mod The module that an optimization pass runs on.
*
* \return The transformed module.
*/
IRModule operator()(IRModule mod) const {
return this->operator()(std::move(mod), PassContext::Current());
}
...
};

这里需要注意的是在PassContextNode定义中出现了一个 instrument::PassInstrument类,这个类是为开发者设计的一个工具,开发者可以实现一些函数运行在每个Pass执行前或者执行后(https://github.com/apache/tvm/blob/main/src/ir/transform.cc#L261):

1
2
3
4
5
6
7
8
9
10
11
12
13
IRModule Pass::operator()(IRModule mod, const PassContext& pass_ctx) const {
const PassNode* node = operator->();
ICHECK(node != nullptr);
const PassInfo& pass_info = node->Info();
if (!pass_ctx.InstrumentBeforePass(mod, pass_info)) {
DLOG(INFO) << "Skipping pass : " << pass_info->name
<< " with opt level: " << pass_info->opt_level;
return mod;
}
auto ret = node->operator()(std::move(mod), pass_ctx);
pass_ctx.InstrumentAfterPass(ret, pass_info);
return std::move(ret);
}

我们可以在 https://github.com/apache/tvm/blob/main/tests/python/relay/test_pass_instrument.py这个测试文件中找到PassInstrument机制的示例用法, 这个功能可以方便的让我们观察每一个IRModule经过一个Pass之后变成新的IRModule之后有什么变化,方便debug或者可视化。

然后TVM为了方便实现了3个级别的Pass,即Module-Level的Pass直接操作IRModule,以及Function-Level的Pass遍历Module 中的Function进行处理,还有Sequential Pass包含一堆顺序执行的Pass(对比PyTorch的nn.Sequential)。感兴趣的读者可以自行阅读源码或者【从零开始学深度学习编译器】七,万字长文入门TVM Pass

接下来我们讲一讲图优化Pass遍历以及重写AST节点的原理。注意,我们这里讲的Pass是TVM内置的作用于TIR AST上的Pass,我们知道TIR AST是由一系列PrimExpr和RelayExpr(非PrimExpr)来表示的,它们都继承了TVM的Expr基础类。所以TVM针对TIR AST的遍历专门做了一个工具类ExprFunctor来做,它定义在 https://github.com/apache/tvm/blob/main/include/tvm/relay/expr_functor.h#L67

1
2
3
4
5
6
7
8
9
10
11
12
13
14
15
16
17
18
19
20
21
22
23
24
25
26
27
28
29
30
31
32
33
34
35
36
37
38
39
40
41
42
43
44
45
46
47
48
49
50
51
52
template <typename R, typename... Args>
class ExprFunctor<R(const Expr& n, Args...)> {
private:
using TSelf = ExprFunctor<R(const Expr& n, Args...)>;
using FType = tvm::NodeFunctor<R(const ObjectRef& n, TSelf* self, Args...)>;

public:
/*! \brief the result type of this functor */
using result_type = R;
/*! \brief virtual destructor */
virtual ~ExprFunctor() {}
/*!
* \brief Same as call.
* \param n The expression node.
* \param args Additional arguments.
* \return The result of the call
*/
R operator()(const Expr& n, Args... args) { return VisitExpr(n, std::forward<Args>(args)...); }
/*!
* \brief The functor call.
* \param n The expression node.
* \param args Additional arguments.
* \return The result of the call
*/
virtual R VisitExpr(const Expr& n, Args... args) {
ICHECK(n.defined()) << "Found null pointer node while traversing AST. The previous pass may "
"have generated invalid data.";
static FType vtable = InitVTable();
return vtable(n, this, std::forward<Args>(args)...);
}
// Functions that can be overriden by subclass
virtual R VisitExpr_(const ConstantNode* op, Args... args) EXPR_FUNCTOR_DEFAULT;
virtual R VisitExpr_(const TupleNode* op, Args... args) EXPR_FUNCTOR_DEFAULT;
virtual R VisitExpr_(const VarNode* op, Args... args) EXPR_FUNCTOR_DEFAULT;
virtual R VisitExpr_(const GlobalVarNode* op, Args... args) EXPR_FUNCTOR_DEFAULT;
virtual R VisitExpr_(const FunctionNode* op, Args... args) EXPR_FUNCTOR_DEFAULT;
virtual R VisitExpr_(const CallNode* op, Args... args) EXPR_FUNCTOR_DEFAULT;
virtual R VisitExpr_(const LetNode* op, Args... args) EXPR_FUNCTOR_DEFAULT;
virtual R VisitExpr_(const IfNode* op, Args... args) EXPR_FUNCTOR_DEFAULT;
virtual R VisitExpr_(const OpNode* op, Args... args) EXPR_FUNCTOR_DEFAULT;
virtual R VisitExpr_(const TupleGetItemNode* op, Args... args) EXPR_FUNCTOR_DEFAULT;
virtual R VisitExpr_(const RefCreateNode* op, Args... args) EXPR_FUNCTOR_DEFAULT;
virtual R VisitExpr_(const RefReadNode* op, Args... args) EXPR_FUNCTOR_DEFAULT;
virtual R VisitExpr_(const RefWriteNode* op, Args... args) EXPR_FUNCTOR_DEFAULT;
virtual R VisitExpr_(const ConstructorNode* op, Args... args) EXPR_FUNCTOR_DEFAULT;
virtual R VisitExpr_(const MatchNode* op, Args... args) EXPR_FUNCTOR_DEFAULT;
virtual R VisitExprDefault_(const Object* op, Args...) {
LOG(FATAL) << "Do not have a default for " << op->GetTypeKey();
throw;
}
...
};

从类的定义可以看到ExprFunctor主要提供了VisitExpr函数接口,并根据Expr的具体类型转发到对应的 VisitExpr_ 。VisitExpr_ 则由派生类负责实现,当然从代码也可以看出,VisitExpr 本身也可以被重载。有了这个转发机制之后,就可以很容易的实现一个遍历所有类型Expr的类了,在TVM中叫作ExprVisitor(https://github.com/apache/tvm/blob/main/include/tvm/relay/expr_functor.h#L149):

1
2
3
4
5
6
7
8
9
10
11
12
13
14
15
16
17
/*!
* \brief A simple visitor wrapper around ExprFunctor.
* Recursively visit the content.
*
* ExprVisitor treats Expr as dataflow graph,
* and only visit each Expr node once.
*/
class ExprVisitor : public ::tvm::relay::ExprFunctor<void(const Expr& n)> {
public:
void VisitExpr(const Expr& expr) override;
void VisitExpr_(const VarNode* op) override;
...

protected:
// Internal visiting counter
std::unordered_map<const Object*, size_t> visit_counter_;
};

比如对于 https://github.com/apache/tvm/blob/main/src/relay/transforms/fold_constant.cc#L68中的 ConstantFolder这个类,就继承了 ExprVisitor,并通过 VisitExpr(expr),访问数据。ExprVisitorVisitExpr成员函数实现如下(https://github.com/apache/tvm/blob/main/src/relay/ir/expr_functor.cc#L289):

1
2
3
4
5
6
7
8
9
10
void ExprVisitor::VisitExpr(const Expr& expr) {
auto it = visit_counter_.find(expr.get());
if (it != visit_counter_.end()) {
++it->second;
} else {
using TParent = ExprFunctor<void(const Expr&)>;
TParent::VisitExpr(expr);
visit_counter_.insert({expr.get(), 1});
}
}

可以看到这个类实际上调用的是父类(ExprFunctor)的 VisitExpr,而 ExprFunctorVisitExpr的实现如下:

1
2
3
4
5
6
virtual R VisitExpr(const Expr& n, Args... args) {
ICHECK(n.defined()) << "Found null pointer node while traversing AST. The previous pass may "
"have generated invalid data.";
static FType vtable = InitVTable();
return vtable(n, this, std::forward<Args>(args)...);
}

可以看到 ExprFunctor设置了 VisitExpr虚函数,在解析时会回到 ExprVisitor来解析节点,而 ConstantFolder这个类继承了 ExprVisitor,这样我们只需要在 ConstantFolder类中重写各个Expr节点类型的 VisitExpr_函数就可以了。

ExprFunctorVisitExpr实现中有一个 RELAY_EXPR_FUNCTOR_DISPATCH宏,这个宏的定义如下:

1
2
3
4
#define RELAY_EXPR_FUNCTOR_DISPATCH(OP)                                                    \
vtable.template set_dispatch<OP>([](const ObjectRef& n, TSelf* self, Args... args) { \
return self->VisitExpr_(static_cast<const OP*>(n.get()), std::forward<Args>(args)...); \
});

这里的 self即为 ExprFunctorVisitExpr的实现中的 vtable(n, this, std::forward<Args>(args)...),而 this指向 ExprFunctor。又因为 ExprVisitor::VisitExpr方法调用的是 ExprFunctor的函数,所以这里的 this指向的是 ExprVisitor实例。

IfNode为例子,看看 ExprVisitorVisitExpr_实现。由于 this指向的是 ExprVisitor实例,最后会在 ExprVisitor实例中生成 visit_counter_的列表。

1
2
3
4
5
6
void ExprVisitor::VisitExpr_(const IfNode* op) {
this->VisitSpan(op->span);
this->VisitExpr(op->cond);
this->VisitExpr(op->true_branch);
this->VisitExpr(op->false_branch);
}

visit_counter_是在 ExprVisitor中定义的一个 unordered_map,来标记在遍历AST时某种Expr是否出现,同时记录下出现的次数来保证每个Expr都只会被访问一次。

1
2
// Internal visiting counter
std::unordered_map<const Object*, size_t> visit_counter_;

显然,如果AST很复杂,这样递归可能会导致Stack Overflow. 为了解决这个问题,TVM 提供了 MixedModeVisitor 来实现和 ExprVisitor 一样的功能,但是避免了 Stack Overflow。

我们上面提到对于AST除了遍历,还有改写的需求,所以TVM提供了一个ExprMutator ,同样继承了 ExprFunctor。类的定义如下:

1
2
3
4
5
6
7
8
9
10
11
12
13
14
15
16
17
18
19
20
21
22
23
24
25
26
27
28
29
30
31
32
33
34
35
36
37
38
39
class ExprMutator : public ::tvm::relay::ExprFunctor<Expr(const Expr&)> {
public:
/*!
* \brief Mutate is alias for VisitExpr
* \return expr.
*/
Expr Mutate(const Expr& expr) { return this->VisitExpr(expr); }
Expr VisitExpr(const Expr& expr) override;
Expr VisitExpr_(const VarNode* op) override;
Expr VisitExpr_(const ConstantNode* op) override;
Expr VisitExpr_(const GlobalVarNode* op) override;
Expr VisitExpr_(const OpNode* op) override;
Expr VisitExpr_(const TupleNode* op) override;
Expr VisitExpr_(const FunctionNode* op) override;
Expr VisitExpr_(const CallNode* call_node) override;
Expr VisitExpr_(const LetNode* op) override;
Expr VisitExpr_(const IfNode* op) override;
Expr VisitExpr_(const TupleGetItemNode* op) override;
Expr VisitExpr_(const RefCreate来表记Node* op) override;
Expr VisitExpr_(const RefReadNode* op) override;
Expr VisitExpr_(const RefWriteNode* op) override;
Expr VisitExpr_(const ConstructorNode* op) override;
Expr VisitExpr_(const MatchNode* op) override;

/*!
* \brief Used to visit the types inside of expressions.
*
* Can be overloaded to transform the types in arbitrary
* ways, one way would be to define a sub-class of type
* visitor for types which transform them appropriately.
*/
virtual Type VisitType(const Type& t);
virtual Clause VisitClause(const Clause& c);
virtual Pattern VisitPattern(const Pattern& c);

protected:
/*! \brief Internal map used for memoization. */
std::unordered_map<Expr, Expr, ObjectPtrHash, ObjectPtrEqual> memo_;
};

注意 Mutate 只是 VisitExpr 的别名。ExprMutator 的 VisitExpr 会返回一个修改后的新 Expr, 看一下 VisitExpr 的实现:

1
2
3
4
5
6
7
8
9
10
Expr ExprMutator::VisitExpr(const Expr& expr) {
auto it = this->memo_.find(expr);
if (it != this->memo_.end()) {
return it->second;
} else {
Expr new_expr = ExprFunctor::VisitExpr(expr);
memo_[expr] = new_expr;
return new_expr;
}
}

可以看到 memo_存储了图中的各个节点。参考IfNode的实现:

1
2
3
4
5
6
7
8
9
10
11
Expr ExprMutator::VisitExpr_(const IfNode* op) {
auto guard = this->Mutate(op->cond);
auto true_b = this->Mutate(op->true_branch);
auto false_b = this->Mutate(op->false_branch);
if (op->cond.same_as(guard) && op->true_branch.same_as(true_b) &&
op->false_branch.same_as(false_b)) {
return GetRef<Expr>(op);
} else {
return If(guard, true_b, false_b, op->span);
}
}

如果 IFNode的子节点都没有被修改,那么就返回这个节点本身。否则创建新的节点 If(guard, true_b, false_b, op->span);并返回。这里构造新节点的类If的定义和实现分别在 https://github.com/apache/tvm/blob/main/src/relay/ir/expr.hhttps://github.com/apache/tvm/blob/main/src/relay/ir/expr.cc中:

1
2
3
4
5
6
7
8
9
10
11
12
13
14
15
16
17
18
19
20
21
class If : public Expr {
public:
/*!
* \brief The constructor
* \param cond The condition of a if node.
* \param true_branch The fall through branch
* \param false_branch The branch for execution when condition is false.
* \param span The source span of the expression.
*/
TVM_DLL If(Expr cond, Expr true_branch, Expr false_branch, Span span = Span());

TVM_DEFINE_OBJECT_REF_METHODS(If, RelayExpr, IfNode);
};

If::If(Expr cond, Expr true_branch, Expr false_branch, Span span) {
ObjectPtr<IfNode> n = make_object<IfNode>();
n->cond = std::move(cond);
n->true_branch = std::move(true_branch);
n->false_branch = std::move(false_branch);
n->span = std::move(span);
data_ = std::move(n);

TVM的Pass里面有一个经典的算符融合Pass,之前在【从零开始学深度学习编译器】八,TVM的算符融合以及如何使用TVM Pass Infra自定义Pass 这里讲过,感兴趣的小伙伴可以看一下。

0x5. Schedule

我认为TVM的Schedule主要分为三个部分:TE Schedule,TIR Schedule以及Auto Schedule。由于精力有限我还没有探索Schedule在TVM的源码实现,不过最近TVM圈子的这篇来自Kord大佬的《TVM 自底向上(四):TE/TIR Schedule 的原理》文章为我们理清了TE/TIR Schedule的原理,个人推荐大家去阅读。链接:https://zhuanlan.zhihu.com/p/534062007

然后关于TE Schedule的调优以及Auto Schedule可以看一下【TVM 三代优化巡礼】在X86上将普通的矩阵乘法算子提速90倍 以及 【tvm算子优化schedule(二)–GPU篇】(https://zhuanlan.zhihu.com/p/403370698) 这几篇文章。

0x6. Runtime

基础概念

基础概念1: PackedFunc

为了便于Python和C++混合编程,TVM使用了统一的PackedFunc机制。PackedFunc可以将C++的函数打包成统一的函数接口并导出到Python端供用户使用,同时也支持从Python中注册一个函数,并伪装成PackedFunc在C++和Python中调用。这里推荐一篇讲解PackedFunc原理的优质博客:https://hjchen2.github.io/2020/01/10/TVM-PackedFunc实现机制/

基础概念2: tvm.runtime.Module

tvm.runtime.Module是tvm编译的结果(这一节之后简称Module)。Module中包含一系列可以运行的PackedFunc(所以这里的Module可以看作<name, PackedFunc>的哈希表),并且Module可以import另一个Module,从而访问其它Module的PackedFunc。我们看一下Module的接口定义(https://github.com/apache/tvm/blob/main/include/tvm/runtime/module.h#L47-L89):

1
2
3
4
5
6
7
8
9
10
11
12
13
14
15
16
17
18
19
20
21
22
23
24
25
26
27
28
29
/*!
* \brief Module container of TVM.
*/
class Module : public ObjectRef {
public:
Module() {}
// constructor from container.
explicit Module(ObjectPtr<Object> n) : ObjectRef(n) {}
/*!
* \brief Get packed function from current module by name.
*
* \param name The name of the function.
* \param query_imports Whether also query dependency modules.
* \return The result function.
* This function will return PackedFunc(nullptr) if function do not exist.
* \note Implemented in packed_func.cc
*/
inline PackedFunc GetFunction(const std::string& name, bool query_imports = false);
// The following functions requires link with runtime.
/*!
* \brief Import another module into this module.
* \param other The module to be imported.
*
* \note Cyclic dependency is not allowed among modules,
* An error will be thrown when cyclic dependency is detected.
*/
inline void Import(Module other);
...
};

然后Module的具体实现由ModuleNode负责,并且不同的target对应不同的ModuleNode实现。我们来看一下CUDAModuldeNode的定义(https://github.com/apache/tvm/blob/main/src/runtime/cuda/cuda_module.cc#L44), 请注意看下面的注释:

1
2
3
4
5
6
7
8
9
10
11
12
13
14
15
16
17
18
19
20
21
22
23
24
25
26
27
28
29
30
31
32
33
34
35
36
// Module to support thread-safe multi-GPU execution.
// cuModule is a per-GPU module
// The runtime will contain a per-device module table
// The modules will be lazily loaded
// CUDAModuleNode对应到CUDA中的CUmodule
class CUDAModuleNode : public runtime::ModuleNode {
public:
...
// 调用cuModuleGetFunction从CUmodule中获取kernel function handle
PackedFunc GetFunction(const std::string& name, const ObjectPtr<Object>& sptr_to_self) final;

// 调用cuModuleGetGlobal从CUmodule中获取全局变量指针
CUdeviceptr GetGlobal(int device_id, const std::string& global_name, size_t expect_nbytes) {
std::lock_guard<std::mutex> lock(mutex_);
// must recheck under the lock scope
if (module_[device_id] == nullptr) {
CUDA_DRIVER_CALL(cuModuleLoadData(&(module_[device_id]), data_.c_str()));
}
CUdeviceptr global;
size_t nbytes;

CUresult result = cuModuleGetGlobal(&global, &nbytes, module_[device_id], global_name.c_str());
ICHECK_EQ(nbytes, expect_nbytes);
if (result != CUDA_SUCCESS) {
const char* msg;
cuGetErrorName(result, &msg);
LOG(FATAL) << "CUDAError: cuModuleGetGlobal " << global_name << " failed with error: " << msg;
}
return global;
}

private:
...
std::array<CUmodule, kMaxNumGPUs> module_;
...
};

我们看一下核心的GetFunction实现(https://github.com/apache/tvm/blob/main/src/runtime/cuda/cuda_module.cc#L244-L257):

1
2
3
4
5
6
7
8
9
10
11
12
13
14
15
16
PackedFunc CUDAModuleNode::GetFunction(const std::string& name,
                                       const ObjectPtr<Object>& sptr_to_self) {
  ICHECK_EQ(sptr_to_self.get(), this);
  ICHECK_NE(name, symbol::tvm_module_main) << "Device function do not have main";
  // 如果name是tvm_prepare_global_barrier,则将CUDAPrepGlobalBarrier包成一个PackedFunc返回
  if (name == symbol::tvm_prepare_global_barrier) {
    return PackedFunc(CUDAPrepGlobalBarrier(this, sptr_to_self));
  }
  auto it = fmap_.find(name);
  if (it == fmap_.end()) return PackedFunc();
  const FunctionInfo& info = it->second;
  CUDAWrappedFunc f;
  f.Init(this, sptr_to_self, name, info.arg_types.size(), info.launch_param_tags);
  // 返回kernel function
  return PackFuncVoidAddr(f, info.arg_types);
}

这里首先根据函数的名称找到描述这个函数的FunctionInfo,而FunctionInfo里面包含了launch_param_tags成员,这个成员中存储了CUDA Kernel Launch时需要的gridDim/blockDim/SharedMemorySize,然后将上下文打包到CUDAWrappedFunc中并包装为一个PackFunc返回。然后我们可以看一下CUDAWrappedFunc是怎么执行的(https://github.com/apache/tvm/blob/main/src/runtime/cuda/cuda_module.cc#L164-L203)。

1
2
3
4
5
6
7
8
9
10
11
12
13
14
15
16
17
18
19
20
21
22
23
24
25
26
27
28
29
30
31
32
33
34
35
36
37
38
39
40
41
// invoke the function with void arguments
  void operator()(TVMArgs args, TVMRetValue* rv, void** void_args) const {
    int device_id;
    CUDA_CALL(cudaGetDevice(&device_id));
    ThreadWorkLoad wl = launch_param_config_.Extract(args);

    if (fcache_[device_id] == nullptr) {
      fcache_[device_id] = m_->GetFunc(device_id, func_name_);
      if (wl.dyn_shmem_size >= (48 << 10)) {
        // Assumption: dyn_shmem_size doesn't change across different invocations of
        // fcache_[device_id]
        CUresult result = cuFuncSetAttribute(
            fcache_[device_id], CU_FUNC_ATTRIBUTE_MAX_DYNAMIC_SHARED_SIZE_BYTES, wl.dyn_shmem_size);
        if (result != CUDA_SUCCESS) {
          LOG(FATAL) << "Failed to set the allowed dynamic shared memory size to "
                     << wl.dyn_shmem_size;
        }
      }
    }
    CUstream strm = static_cast<CUstream>(CUDAThreadEntry::ThreadLocal()->stream);
    CUresult result = cuLaunchKernel(fcache_[device_id], wl.grid_dim(0), wl.grid_dim(1),
                                     wl.grid_dim(2), wl.block_dim(0), wl.block_dim(1),
                                     wl.block_dim(2), wl.dyn_shmem_size, strm, void_args, nullptr);
    if (result != CUDA_SUCCESS && result != CUDA_ERROR_DEINITIALIZED) {
      const char* msg;
      cuGetErrorName(result, &msg);
      std::ostringstream os;
      os << "CUDALaunch Error: " << msg << "\n"
         << " grid=(" << wl.grid_dim(0) << "," << wl.grid_dim(1) << "," << wl.grid_dim(2) << "), "
         << " block=(" << wl.block_dim(0) << "," << wl.block_dim(1) << "," << wl.block_dim(2)
         << ")\n";
      std::string cuda = m_->GetSource("");
      if (cuda.length() != 0) {
        os << "// func_name=" << func_name_ << "\n"
           << "// CUDA Source\n"
           << "// -----------\n"
           << cuda;
      }
      LOG(FATAL) << os.str();
    }
  }

从这里可以看到CUDAWrappedFunc会根据func_name在CUDAModuleNode中找到CUfunction然后根据launch_param_config_进行Kernel Launch。这里的fcache_[device_id]是用来缓存当前device上的CUFunction的,避免重复查找带来的额外开销。另外在CUDAModuleNode::GetFunction的定义中提到如果name是tvm_prepare_global_barrier,则将CUDAPrepGlobalBarrier包成一个PackedFunc返回,在CUDA 9.0之前是不支持Global Barrier的,所以这里TVM通过类似spin lock的方式,自旋地检查一个全局变量的值来block 线程执行,从而实现Global Barrier。核心实现见:

1
2
3
4
5
6
7
8
9
10
11
12
13
14
15
16
17
18
19
20
21
22
23
24
25
26
27
class CUDAPrepGlobalBarrier {
 public:
  CUDAPrepGlobalBarrier(CUDAModuleNode* m, ObjectPtr<Object> sptr) : m_(m), sptr_(sptr) {
    std::fill(pcache_.begin(), pcache_.end(), 0);
  }
 // 用一个global variable来实现GPU上的global barrier。此函数用来set global variable to 1。
 // 然后kernel function中会spin的check global variable的值,为1之后,再进行接下来的操作。
 // 详细看:https://github.com/apache/tvm/pull/362#issuecomment-323781410
  void operator()(const TVMArgs& args, TVMRetValue* rv) const {
    int device_id;
    CUDA_CALL(cudaGetDevice(&device_id));
    if (pcache_[device_id] == 0) {
      pcache_[device_id] =
          m_->GetGlobal(device_id, runtime::symbol::tvm_global_barrier_state, sizeof(unsigned));
    }
    CUDA_DRIVER_CALL(cuMemsetD32(pcache_[device_id], 01));
  }

 private:
  // internal module
  CUDAModuleNode* m_;
  // the resource holder
  ObjectPtr<Object> sptr_;
  // mark as mutable, to enable lazy initialization
  mutable std::array<CUdeviceptr, kMaxNumGPUs> pcache_;
};

除了CUDAModuleNode之外,其它的硬件抽象都实现了一个对应的ModuleNode比如OpenCLModuleNode,ROCMModuleNode等等。借助Module和PackFunc我们可以将不同device生成的代码打包成统一的形式。但如果想要执行这些生成的代码,我们需要做内存管理,同步等一系列操作,TVM将这些操作抽象为DeviceAPI。

基础概念3: DeviceAPI 抽象

TVM通过DeviceAPI 类来对硬件的能力进行抽象,形成了几个统一的接口(在OneFlow中有一个硬件抽象模块EP和这个类似)。只要为每一种device重载了这些统一的接口,那么执行器(runtime)就可以通过访问这些统一的接口使用device的某种能力,比如查询参数,内存分配,数据拷贝,同步等等。DeviceAPI的定义在:https://github.com/apache/tvm/blob/main/include/tvm/runtime/device_api.h#L71。这里有一些通用的接口比如SetDevice,GetAttr,GetTargetProperty,AllocDataSpace等等,然后对于不同的device比如cpu,cuda,hexagon,metal,rocm,vulkan,opencl都会基于各自的runtime api重写这些接口。这些接口对于TVM的执行引擎非常重要。

Module,PackFunc,DeviceAPI分别从不同的角度对硬件的功能进行了封装,比如Module封装了加载device Module(比如CUModule),加载Kernel,统一打包设备代码等功能,DeviceAPI封装了内存分配释放,数据拷贝等功能,但这些功能必须要有一个执行引擎凑到一起才可以run起来。TVM提供了2种执行引擎。

Graph Executor

GraphExecutor是TVM为静态模型设计的执行引擎(不支持动态Shape和Control Flow)。我们先看一个GraphExecutor执行一个Relay Function的示例(https://github.com/BBuf/tvm_mlir_learn/blob/main/relay/simplenet.ipynb):

1
2
3
4
5
6
7
8
9
10
11
12
13
14
15
16
17
18
19
20
21
22
23
24
25
26
27
28
29
30
31
32
33
34
35
36
37
38
39
40
41
42
43
44
45
46
47
48
49
50
51
52
53
54
55
56
57
58
59
60
61
62
63
64
65
66
67
68
69
70
71
72
73
74
75
76
77
78
79
80
81
82
83
84
85
86
#coding=utf-8
import tvm
from tvm import relay
import numpy as np
from tvm.contrib import graph_executor

# 构造BN
def batch_norm(data,
                     gamma=None,
                     beta=None,
                     moving_mean=None,
                     moving_var=None,
                     **kwargs):
    name = kwargs.get("name")
    kwargs.pop("name")
    if not gamma:
        gamma = relay.var(name + "_gamma")
    if not beta:
        beta = relay.var(name + "_beta")
    if not moving_mean:
        moving_mean = relay.var(name + "_moving_mean")
    if not moving_var:
        moving_var = relay.var(name + "_moving_var")
    return relay.nn.batch_norm(data,
                               gamma=gamma,
                               beta=beta,
                               moving_mean=moving_mean,
                               moving_var=moving_var,
                               **kwargs)[0]

# 构造卷积
def conv2d(data, weight=None, **kwargs):
    name = kwargs.get("name")
    kwargs.pop("name")
    if not weight:
        weight = relay.var(name + "_weight")
    return relay.nn.conv2d(data, weight, **kwargs)


# 构造卷积+BN+ReLU的simpleNet
def simplenet(data, name, channels, kernel_size=(33), strides=(11),
               padding=(11), epsilon=1e-5):
    conv = conv2d(
        data=data,
        channels=channels,
        kernel_size=kernel_size,
        strides=strides,
        padding=padding,
        data_layout='NCHW',
        name=name+'_conv')
    bn = batch_norm(data=conv, epsilon=epsilon, name=name + '_bn')
    act = relay.nn.relu(data=bn)
    return act

data_shape = (13224224)
kernel_shape = (32333)
dtype = "float32"
data = relay.var("data", shape=data_shape, dtype=dtype)
act = simplenet(data, "graph"32, strides=(22))
func = relay.Function(relay.analysis.free_vars(act), act)

np_data = np.random.uniform(-11, (13224224))

params = {
    "graph_conv_weight": tvm.nd.array(np.random.uniform(-11, (32333)).astype(dtype)),
    "graph_bn_gamma": tvm.nd.array(np.random.uniform(-11, (32)).astype(dtype)),
    "graph_bn_beta": tvm.nd.array(np.random.uniform(-11, (32)).astype(dtype)),
    "graph_bn_moving_mean": tvm.nd.array(np.random.uniform(-11, (32)).astype(dtype)),
    "graph_bn_moving_var": tvm.nd.array(np.random.uniform(-11, (32)).astype(dtype)),
}

print(func)

with tvm.transform.PassContext(opt_level=10):
    lib = relay.build(func, "llvm", params=params)


dev = tvm.cpu(0)
dtype = "float32"
m = graph_executor.GraphModule(lib["default"](dev))
# set inputs
m.set_input("data", tvm.nd.array(np_data.astype(dtype)))
# execute
m.run()
# get outputs
tvm_output = m.get_output(0)

这里首先创建了一个GraphExecutor对象并使用Relay Function的编译结果对其进行初始化,RelayFunction的编译结果包含序列化图结构(对应executor_config)、kernel(对应mod)、weight(对应params)。

图片
relay.build返回结果:https://github.com/apache/tvm/blob/main/python/tvm/relay/build_module.py#L178

接下来为GraphExecutor对象设置输入数据,然后调用run子函数来执行kernel,最后get_output获取输出结果。GraphExecutor的实现主要有2个函数,第一个函数就是Init(https://github.com/apache/tvm/blob/main/src/runtime/graph_executor/graph_executor.cc#L77)。

1
2
3
4
5
6
7
8
9
10
11
12
13
14
15
16
17
18
19
20
21
22
23
24
25
26
27
28
29
30
31
32
33
34
35
/*!
 * \brief Initialize the graph executor with graph and device.
 * \param graph_json The execution graph.
 * \param module The module containing the compiled functions for the host
 * processor.
 * \param devs The devices of the host and devices where graph nodes will be
 * executed on.
 * \param lookup_linked_param_func Linked parameter lookup function. Default is nullptr.
 */
void GraphExecutor::Init(const std::string& graph_json, tvm::runtime::Module module,
                         const std::vector<Device>& devs,
                         const PackedFunc lookup_linked_param_func) {
  std::istringstream is(graph_json);
  dmlc::JSONReader reader(&is);
  this->Load(&reader);
  module_ = module;
  devices_ = devs;
  lookup_linked_param_ = lookup_linked_param_func;
  if (lookup_linked_param_ == nullptr) {
    lookup_linked_param_ = PackedFunc(
        [this](TVMArgs args, TVMRetValue* rv) { this->DefaultLookupLinkedParam(args, rv); });
  }
  this->SetupStorage();
  this->SetupOpExecs();
  for (size_t i = 0; i < input_nodes_.size(); i++) {
    const uint32_t nid = input_nodes_[i];
    std::string& name = nodes_[nid].name;
    input_map_[name] = i;
  }
  for (size_t i = 0; i < outputs_.size(); i++) {
    const uint32_t nid = outputs_[i].node_id;
    std::string& name = nodes_[nid].name;
    output_map_[name] = i;
  }
}

这个函数中主要包含json参数解析。为每一个算子的input/output edge准备对应的memory(对应SetupStorage) 以及为每一个算子准备一个可调用的kernel function用来做实际的计算(对应SetupOpExecs)。

json就是计算图的表示,表示了node之间的连接关系,输入、输出node、输入shape等信息,上面的代码中Load(Read)会提取json中的信息,存储在graph_executor成员变量中。

Virtual Machine

目前我基本没有使用过这种运行时,并且了解也比较少,所以这里就留坑不展开了。VM是TVM中更加灵活的一种运行时,它可以支持动态模型(也就是带动态Shape和Control Flow的)的执行。其实,从MLC的课件也可以看到Relax在处理动态Shape程序时也用到了这个运行时。

一位Intel的工程师在《TVM Runtime System 概述》介绍了TVM的Relay Virtual Machine运行时,感兴趣的小伙伴可以去阅读一下:https://zhuanlan.zhihu.com/p/504066888

0x7. Codegen

之前提到IRModule是编译的最小单元,然后当我们执行类似于 mod = tvm.build(ir_module, target="c/cuda/llvm") 可以将IRModule编译为 tvm.runtime.Module,这里的target参数就是用来选择使用哪一个CodeGen来编译TIR AST的。比如我们要编译CPU可以执行的代码,那么target参数可以选择"c"或者"llvm"。如果要编译成CUDA代码,那么参数设置为"cuda"或者“llvm”。然后tvm.build会根据target参数找已经注册的build函数,在TVM中使用TVM_REGISTER_GLOBAL宏注册build函数。例如:https://github.com/apache/tvm/blob/main/src/target/source/codegen_c_host.cc#L466 这里的 TVM_REGISTER_GLOBAL("target.build.c").set_body_typed(BuildCHost); 以及 https://github.com/apache/tvm/blob/main/src/target/opt/build_cuda_on.cc#L165 这里的 TVM_REGISTER_GLOBAL("target.build.cuda").set_body_typed(BuildCUDA);

我们这里以生成c代码为例介绍一下Codegen的原理。当target="c"时,tvm.build调用的是提前注册的target.build.c的全局函数(https://github.com/apache/tvm/blob/main/src/target/source/codegen_c_host.cc#L390)。代码实现如下:

1
2
3
4
5
6
7
8
9
10
11
12
13
14
15
16
17
18
19
20
21
22
23
24
25
26
27
28
29
30
31
32
33
34
35
36
37
38
39
40
41
42
43
44
45
46
47
48
49
50
51
52
53
54
55
56
57
58
59
60
61
62
63
64
65
66
67
68
69
70
71
72
73
74
75
76
77
78
runtime::Module BuildCHost(IRModule mod, Target target) {
  using tvm::runtime::Registry;
  bool output_ssa = false;
  bool emit_asserts = false;

  std::unordered_set<std::string> devices;
  if (mod->GetAttr<Map<GlobalVar, String>>("device_contexts") != nullptr) {
    Map<GlobalVar, String> device_contexts =
        mod->GetAttr<Map<GlobalVar, String>>("device_contexts").value();
    for (auto const& context : device_contexts) {
      devices.insert(context.second.data());
    }
  }
  // 初始化CodeGenCHost对象
  CodeGenCHost cg;
  cg.Init(output_ssa, emit_asserts, target->str(), devices);
  cg.SetConstantsByteAlignment(target->GetAttr<Integer>("constants-byte-alignment").value_or(16));
  PrimFunc aot_executor_fn;

  std::vector<std::pair<tvm::GlobalVar, tvm::BaseFunc>> funcs;
  for (auto kv : mod->functions) {
    // Make sure that the executor function is the last one to be code generated so that all the
    // symbols are available to __tvm_main__
    auto fun_name = std::string(kv.first->name_hint);
    bool is_aot_executor_fn = kv.second->GetAttr<Bool>("runner_function"Bool(false)).value();

    if (is_aot_executor_fn) {
      aot_executor_fn = Downcast<PrimFunc>(kv.second);
      continue;
    }
    funcs.push_back(kv);
  }

  // Sort functions
  std::sort(funcs.begin(), funcs.end(),
            [](std::pair<tvm::GlobalVar, tvm::BaseFunc> kv_a,
               std::pair<tvm::GlobalVar, tvm::BaseFunc> kv_b) {
              std::string name_hint_a = kv_a.first->name_hint;
              std::string name_hint_b = kv_b.first->name_hint;
              return name_hint_a < name_hint_b;
            });

  // Add all functions except __tvm_main__
  // 把IRModule里所有的tir::PrimFunc都放到编译列表里面
  for (auto& kv : funcs) {
    ICHECK(kv.second->IsInstance<PrimFuncNode>()) << "CodegenCHost: Can only take PrimFunc";
    auto f = Downcast<PrimFunc>(kv.second);
    cg.AddFunction(f);
  }

  // Add __tvm_main__
  if (aot_executor_fn.defined()) {
    cg.AddFunction(aot_executor_fn);
  }

  // NOTE: it's possible that kRuntime attr is not attached when the mod was built with tvm.build().
  // See issue #10373.
  auto opt_runtime = mod->GetAttr<relay::Runtime>(tvm::attr::kRuntime);
  relay::Runtime runtime;
  if (opt_runtime.get() != nullptr) {
    runtime = opt_runtime.value();
  } else {
    runtime = relay::Runtime::Create("cpp", {});
  }
  if (aot_executor_fn.defined() && runtime->name == relay::kTvmRuntimeCpp) {
    cg.InitGlobalContext();
  }

  if (target->GetAttr<Bool>("system-lib").value_or(Bool(false))) {
    ICHECK_EQ(target->GetAttr<String>("runtime").value_or(""), "c")
        << "c target only supports generating C runtime SystemLibs";
  }
  // cg.Finish()是核心的函数,将IRModule Lower为c代码
  std::string code = cg.Finish();
  // 编译c代码并创建runtime::Module wrapper。
  return CSourceModuleCreate(code, "c", cg.GetFunctionNames());
}

上面代码中的核心是CodeGenCHost这个类,这个类定义在 https://github.com/apache/tvm/blob/main/src/target/source/codegen_c_host.h#L40 。这个类又继承自CodegenC类,https://github.com/apache/tvm/blob/main/src/target/source/codegen_c.h#L59 。我们看一下CodegenC类的定义(简化了代码):

1
2
3
4
5
6
7
8
9
10
11
12
13
14
15
16
17
18
19
20
21
22
23
24
25
26
27
28
29
30
31
32
33
34
35
36
37
38
39
40
41
42
43
44
45
46
47
48
49
50
51
52
53
54
55
56
57
58
59
60
61
62
63
64
65
66
67
68
69
70
71
72
73
74
75
76
77
78
79
80
81
82
83
84
85
86
87
88
89
90
91
92
93
94
95
96
97
98
99
100
101
102
103
104
105
106
107
108
109
110
111
112
113
114
115
116
117
118
119
120
121
122
/*!
 * \brief A base class to generate C code.
 *
 *  CodeGenC have two modes: generate SSA formed C code or normal form.
 *
 * **NOTE** CodeGenC does not aim at generating C codes consumed by MSVC or GCC,
 * Rather, it's providing infrastructural abstraction for C variants like CUDA
 * and OpenCL-C. You might find some odd variant features, e.g., type `int3` for
 * a vector of 3 `int`s. For native C code generator, see `CodeGenLLVM`.
 */
class CodeGenC : public ExprFunctor<void(const PrimExpr&, std::ostream&)>,
                 public StmtFunctor<void(const Stmt&)>,
                 public CodeGenSourceBase {
 public:
  /*!
   * \brief Initialize the code generator.
   * \param output_ssa Whether output SSA.
   */
  void Init(bool output_ssa);
  /*!
   * \brief Add the function to the generated module.
   * \param f The function to be compiled.
   * \param whether to append return 0 in the end.
   */
  void AddFunction(const PrimFunc& f);
  /*!
   * \brief Finalize the compilation and return the code.
   * \return The code.
   */
  std::string Finish();
  /*!
   * \brief Print the Stmt n to CodeGenC->stream
   * \param n The statement to be printed.
   */
  void PrintStmt(const Stmt& n) VisitStmt(n); }
  /*!
   * \brief Print the expression n(or its ssa id if in ssa mode) into os
   * \param n The expression to be printed.
   * \param os The output stream
   */
  void PrintExpr(const PrimExpr& n, std::ostream& os);
  /*!
   * \brief Same as PrintExpr, but simply returns result string
   * \param n The expression to be printed.
   */
  std::string PrintExpr(const PrimExpr& n) {
    std::ostringstream os;
    PrintExpr(n, os);
    return os.str();
  }
  // The following parts are overloadable print operations.
  /*!
   * \brief Print the function header before the argument list
   *
   *  Example: stream << "void";
   */
  virtual void PrintFuncPrefix();  // NOLINT(*)
  /*!
   * \brief Print extra function attributes
   *
   *  Example: __launch_bounds__(256) for CUDA functions
   */
  virtual void PrintExtraAttrs(const PrimFunc& f);
  /*!
   * \brief Print the final return at the end the function.
   */
  virtual void PrintFinalReturn();  // NOLINT(*)
  /*!
   * \brief Insert statement before function body.
   * \param f The function to be compiled.
   */
  virtual void PreFunctionBody(const PrimFunc& f) {}
  /*!
   * \brief Initialize codegen state for generating f.
   * \param f The function to be compiled.
   */
  virtual void InitFuncState(const PrimFunc& f);
  // expression
  void VisitExpr_(const VarNode* op, std::ostream& os) override;         // NOLINT(*)
  void VisitExpr_(const LoadNode* op, std::ostream& os) override;        // NOLINT(*)
  void VisitExpr_(const BufferLoadNode* op, std::ostream& os) override;  // NOLINT(*)
  void VisitExpr_(const LetNode* op, std::ostream& os) override;         // NOLINT(*)
  void VisitExpr_(const CallNode* op, std::ostream& os) override;        // NOLINT(*)
  void VisitExpr_(const AddNode* op, std::ostream& os) override;         // NOLINT(*)
  void VisitExpr_(const SubNode* op, std::ostream& os) override;         // NOLINT(*)
  void VisitExpr_(const MulNode* op, std::ostream& os) override;         // NOLINT(*)
  void VisitExpr_(const DivNode* op, std::ostream& os) override;         // NOLINT(*)
  void VisitExpr_(const ModNode* op, std::ostream& os) override;         // NOLINT(*)
  void VisitExpr_(const MinNode* op, std::ostream& os) override;         // NOLINT(*)
  void VisitExpr_(const MaxNode* op, std::ostream& os) override;         // NOLINT(*)
  void VisitExpr_(const EQNode* op, std::ostream& os) override;          // NOLINT(*)
  void VisitExpr_(const NENode* op, std::ostream& os) override;          // NOLINT(*)
  void VisitExpr_(const LTNode* op, std::ostream& os) override;          // NOLINT(*)
  void VisitExpr_(const LENode* op, std::ostream& os) override;          // NOLINT(*)
  void VisitExpr_(const GTNode* op, std::ostream& os) override;          // NOLINT(*)
  void VisitExpr_(const GENode* op, std::ostream& os) override;          // NOLINT(*)
  void VisitExpr_(const AndNode* op, std::ostream& os) override;         // NOLINT(*)
  void VisitExpr_(const OrNode* op, std::ostream& os) override;          // NOLINT(*)
  void VisitExpr_(const CastNode* op, std::ostream& os) override;        // NOLINT(*)
  void VisitExpr_(const NotNode* op, std::ostream& os) override;         // NOLINT(*)
  void VisitExpr_(const SelectNode* op, std::ostream& os) override;      // NOLINT(*)
  void VisitExpr_(const RampNode* op, std::ostream& os) override;        // NOLINT(*)
  void VisitExpr_(const ShuffleNode* op, std::ostream& os) override;     // NOLINT(*)
  void VisitExpr_(const BroadcastNode* op, std::ostream& os) override;   // NOLINT(*)
  void VisitExpr_(const IntImmNode* op, std::ostream& os) override;      // NOLINT(*)
  void VisitExpr_(const FloatImmNode* op, std::ostream& os) override;    // NOLINT(*)
  void VisitExpr_(const StringImmNode* op, std::ostream& os) override;   // NOLINT(*)
  // statment
  void VisitStmt_(const LetStmtNode* op) override;
  void VisitStmt_(const StoreNode* op) override;
  void VisitStmt_(const BufferStoreNode* op) override;
  void VisitStmt_(const ForNode* op) override;
  void VisitStmt_(const WhileNode* op) override;
  void VisitStmt_(const IfThenElseNode* op) override;
  void VisitStmt_(const AllocateNode* op) override;
  void VisitStmt_(const AttrStmtNode* op) override;
  void VisitStmt_(const AssertStmtNode* op) override;
  void VisitStmt_(const EvaluateNode* op) override;
  void VisitStmt_(const SeqStmtNode* op) override;
  void VisitStmt_(const AllocateConstNode* op) override;
  void VisitStmt_(const DeclBufferNode* op) override;
  ...

CodegenC类的定义中重载了VisitExpr_和VisitStmt_两种函数分别处理TIR AST中的Expression节点(表达式) 和 Statement节点(语句)。Expression(表达式)中包含了常见的变量声明、运算、判断、函数调用,而 Statement(语句)中包含了控制流(if-else,Loop 等)、内存管理、赋值等操作。在https://github.com/apache/tvm/blob/main/src/target/source/codegen_c.cc 中对每一种AST节点进行对应的代码生成(定向到一个文件输出流中),比如:

图片

其它类型的Codegen比如CUDA,LLVM IR等的原理都是一样的,只不过根据target的不同AST Node翻译的目标代码语句的语法又一点区别而已。

0x8. 工具介绍

这一节为大家介绍2个有用的工具。

第一个工具是《FFI Navigator: 跨语言调用跳转IDE插件》原文见:https://zhuanlan.zhihu.com/p/103426525 。这个工具的作用就是支持tvm项目中从c++和python之间的函数调用跳转以及类型object定义的跳转。除了tvm最近小伙伴还加入了对pytorch,mxnet,dgl的支持,有兴趣的同学也可以尝试一下。可以在vscode中直接配置使用。工具的github链接:https://github.com/tqchen/ffi-navigator/

第二个工具是《Relay IR可视化》,应该也可以用到Relax上,这个工具来自一个TVM的PR(https://github.com/apache/tvm/pull/3259/files),这个PR提供了一个python/tvm/relay/visualize.py文件,我们可以稍加修改进行使用。修改后的脚本如下(注意要放到python/tvm/relay/visualize.py这个路径):

1
2
3
4
5
6
7
8
9
10
11
12
13
14
15
16
17
18
19
20
21
22
23
24
25
26
27
28
29
30
31
32
33
34
35
36
37
38
39
40
41
42
43
44
45
46
47
48
49
50
51
52
53
54
55
from .expr_functor import ExprFunctor
import networkx as nx

class VisualizeExpr(ExprFunctor):
    def __init__(self):
        super().__init__()
        self.graph = nx.DiGraph()
        self.counter = 0

    def viz(self, expr):
        for param in expr.params:
            self.visit(param)

        return self.visit(expr.body)

    def visit_constant(self, const): # overload this!
        pass

    def visit_var(self, var):
        name = var.name_hint
        self.graph.add_node(name)
        self.graph.nodes[name]['style'] = 'filled'
        self.graph.nodes[name]['fillcolor'] = 'mistyrose'
        return var.name_hint

    def visit_tuple_getitem(self, get_item):
        tuple = self.visit(get_item.tuple_value)
        # self.graph.nodes[tuple]
        index = get_item.index
        # import pdb; pdb.set_trace()
        return tuple

    def visit_call(self, call):
        parents = []
        for arg in call.args:
            parents.append(self.visit(arg))
        # assert isinstance(call.op, _expr.Op)
        name = "{}({})".format(call.op.name, self.counter)
        self.counter += 1
        self.graph.add_node(name)
        self.graph.nodes[name]['style'] = 'filled'
        self.graph.nodes[name]['fillcolor'] = 'turquoise'
        self.graph.nodes[name]['shape'] = 'diamond'
        edges = []
        for i, parent in enumerate(parents):
            edges.append((parent, name, { 'label''arg{}'.format(i) }))
        self.graph.add_edges_from(edges)
        return name

def visualize(expr,mydir="relay_ir.png"):
    viz_expr = VisualizeExpr()
    viz_expr.viz(expr)
    graph = viz_expr.graph
    dotg = nx.nx_pydot.to_pydot(graph)
    dotg.write_png(mydir)

然后我们在tvm_learn/tmp/tvm/python/tvm/relay/ init .py把这个visualize注册一下,添加 from . import visualize

还需要安装一下pydot和graphviz可视化包:

1
2
pip3 install pydot
sudo apt-get install graphviz

最后我们就可以使用这个模块来做Relay IR的可视化了,还是以第6节的那个例子:

1
2
3
4
5
6
7
8
9
10
11
12
13
14
15
16
17
18
19
20
21
22
23
24
25
26
27
28
29
30
31
32
33
34
35
36
37
38
39
40
41
42
43
44
45
46
47
48
49
50
51
52
53
54
55
56
57
58
59
60
61
62
63
#coding=utf-8
import tvm
from tvm import relay
import numpy as np
from tvm.contrib import graph_executor
from tvm.relay.visualize import visualize

# 构造BN
def batch_norm(data,
                     gamma=None,
                     beta=None,
                     moving_mean=None,
                     moving_var=None,
                     **kwargs):
    name = kwargs.get("name")
    kwargs.pop("name")
    if not gamma:
        gamma = relay.var(name + "_gamma")
    if not beta:
        beta = relay.var(name + "_beta")
    if not moving_mean:
        moving_mean = relay.var(name + "_moving_mean")
    if not moving_var:
        moving_var = relay.var(name + "_moving_var")
    return relay.nn.batch_norm(data,
                               gamma=gamma,
                               beta=beta,
                               moving_mean=moving_mean,
                               moving_var=moving_var,
                               **kwargs)[0]

# 构造卷积
def conv2d(data, weight=None, **kwargs):
    name = kwargs.get("name")
    kwargs.pop("name")
    if not weight:
        weight = relay.var(name + "_weight")
    return relay.nn.conv2d(data, weight, **kwargs)


# 构造卷积+BN+ReLU的simpleNet
def simplenet(data, name, channels, kernel_size=(33), strides=(11),
               padding=(11), epsilon=1e-5):
    conv = conv2d(
        data=data,
        channels=channels,
        kernel_size=kernel_size,
        strides=strides,
        padding=padding,
        data_layout='NCHW',
        name=name+'_conv')
    bn = batch_norm(data=conv, epsilon=epsilon, name=name + '_bn')
    act = relay.nn.relu(data=bn)
    return act

data_shape = (13224224)
kernel_shape = (32333)
dtype = "float32"
data = relay.var("data", shape=data_shape, dtype=dtype)
act = simplenet(data, "graph"32, strides=(22))
func = relay.Function(relay.analysis.free_vars(act), act)

visualize(func)

在当前目录会生成可视化的png图片,预览一下:

我们知道TIR AST是由一系列PrimExpr和RelayExpr(非PrimExpr)来表示的,它们都继承了TVM的Expr基础类。所以TVM针对TIR AST的遍历专门做了一个工具类ExprFunctor。而这可视化个工具就是通过继承ExprFunctor来遍历计算图并自定义可视化效果。

0x9. 结论

这篇文章就是对TVM的重新梳理,从前端到图优化以及后端,比较宏观的叙述了TVM整个架构,希望对入门TVM的读者有帮助。

0x10. 参考

其它博客精选(TVM&MLIR 相关)

  • 深度学习编译器 TVM 代码串讲
  • TVM Overview
  • TVM - Relay IR计算图可视化
  • TVM - 代码生成流程
  • TVM/VTA代码生成流程
  • tvm算子优化schedule(一)–CPU篇
  • tvm算子优化schedule(二)–GPU篇
  • TVM Runtime System 概述
  • TVM PackedFunc实现机制
  • 向外借力:Pluto助力MLIR编译器的多面体优化
  • TVM 自底向上(一):基本框架和概念
  • TVM 自底向上(二):TIR 的概念和编译原理
  • TVM 自底向上(三):TE 的概念和编译原理
  • TVM 自底向上(四):TE/TIR Schedule 的原理
  • 陈天奇 MLC课程
  • 深度学习编译器学习笔记和实践体会
  • FFI Navigator: 跨语言调用跳转IDE插件